.png?width=688&name=TD2-G1000-Horizon-RD1%20(1).png) Below are step by step instructions on how to align and configure the monitors on a Redbird TD/TD2 system with horizon expansion monitors. These instructions are written for systems running:
Below are step by step instructions on how to align and configure the monitors on a Redbird TD/TD2 system with horizon expansion monitors. These instructions are written for systems running:
- Windows 10
- Redbird Navigator version 3.6.0 (or higher)
For Windows 7 systems, download legacy instructions here: TD Horizon - Aligning and Configuring Monitors
Overview/Navigation
- Open the Windows Display Settings menu
- Identify and arrange the monitors
- Set the center monitor to be the main/primary display
- Reboot the system and test
Instructions
Before you begin: Make sure that your horizon monitors are physically level with the center screen. To adjust, loosen the four screws on the back of the horizon mounting bracket, then slide the horizon monitors up or down to match the center screen.
-
Open the Windows Display Settings menu
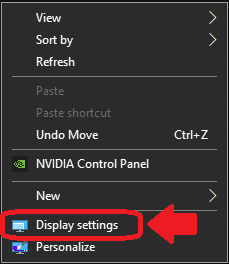
- Move the mouse-cursor off of the Redbird Navigator user interface onto the Windows desktop (blank area on either side-monitor).
- Right click, then select Display settings in the small context menu that appears
- The Windows Display Settings menu should appear.
-
Identify and arrange the monitors
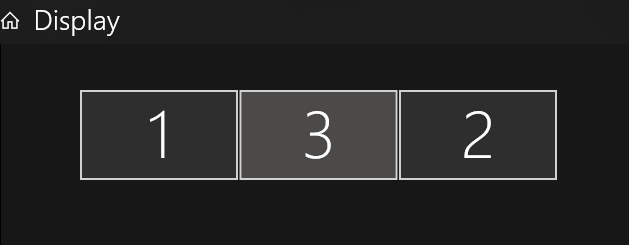
- Press the Identify button near the top of the Display Settings menu, beneath the numbered boxes that represent your screens/monitors.
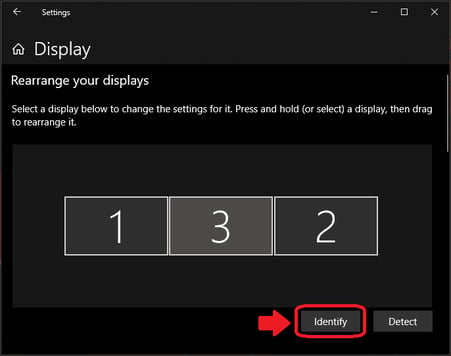
- A number will appear on each of your monitors/screens; take note of which monitor is showing which number.
Note: Your displays may not match the example shown below.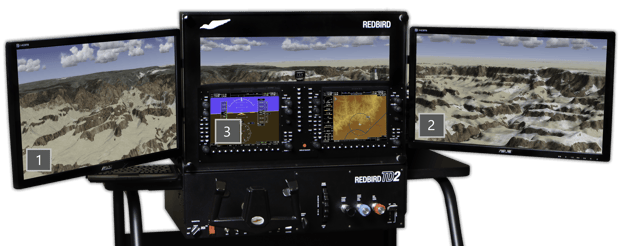 example shown:
1 is appearing on the Left-side monitor
3 is appearing on the Center monitor
2 is appearing on the Right-side monitor - Click and drag the numbered boxes in the Windows Display Settings menu to match how your monitors identify.
Make sure that the top of each monitor lines up with the top of the next; the simulation software draws from the top, so ensuring that the tops of all monitors are lined up makes sure the horizon lines up when you load a flight. The monitors should "snap" to each other when dragged and dropped; but you can use the arrow-keys on the keyboard to adjust them further if they're not snapping correctly.
Note: Your displays may not match the example shown below.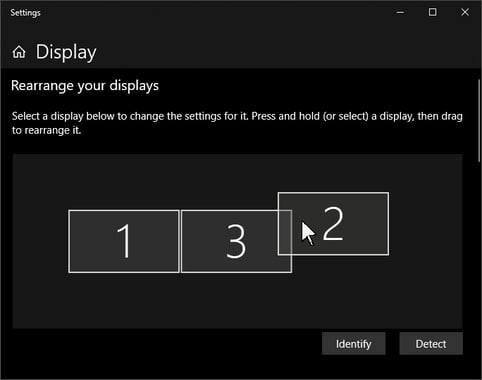 So in the provided example, the boxes in the Display Settings menu should be arranged in the following order:


- Press the Identify button near the top of the Display Settings menu, beneath the numbered boxes that represent your screens/monitors.
Set the center monitor to be the main/primary display
- In the Windows Display Settings menu, select the center screen by clicking on it. The box/screen should change to a lighter color, indicating it has been selected.
- Scroll down towards the bottom of the Display Settings menu, fill the checkbox next to "Make this my main display"
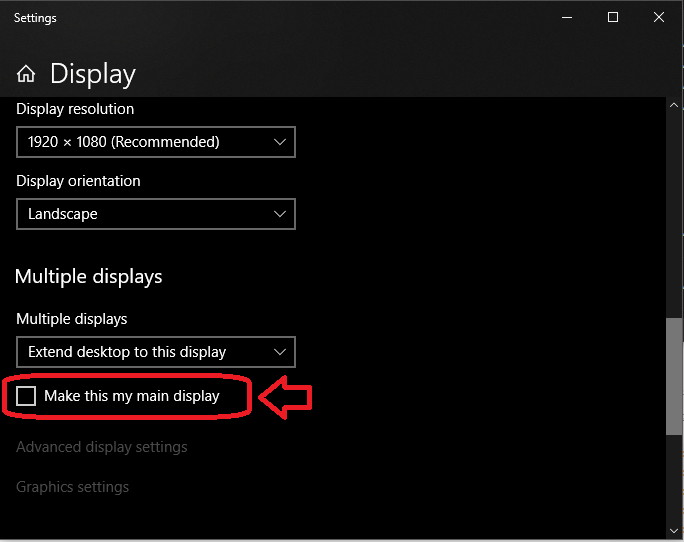
Note: Move the mouse cursor to the right side of the Display Settings menu to make the scrollbar appear if you do not see it.
If the center monitor is already set to be the main display, the checkbox should be filled and the setting should be "greyed out".
- In the Windows Display Settings menu, select the center screen by clicking on it. The box/screen should change to a lighter color, indicating it has been selected.
Restart the system
Once the system reboots, load a test flight to see if the monitors are properly configured
Note: If your horizon is not level when you load a test flight:
- Make sure that your horizon monitors are level with the center screen. To adjust, loosen the four screws on the back of the horizon mounting bracket, then slide the horizon monitors up or down to match the center screen.
- Make sure that the top of each monitor lines up with the top of the next in the Windows Display Settings menu. Reference step 2.c for instructions
For assistance, Contact Redbird Support