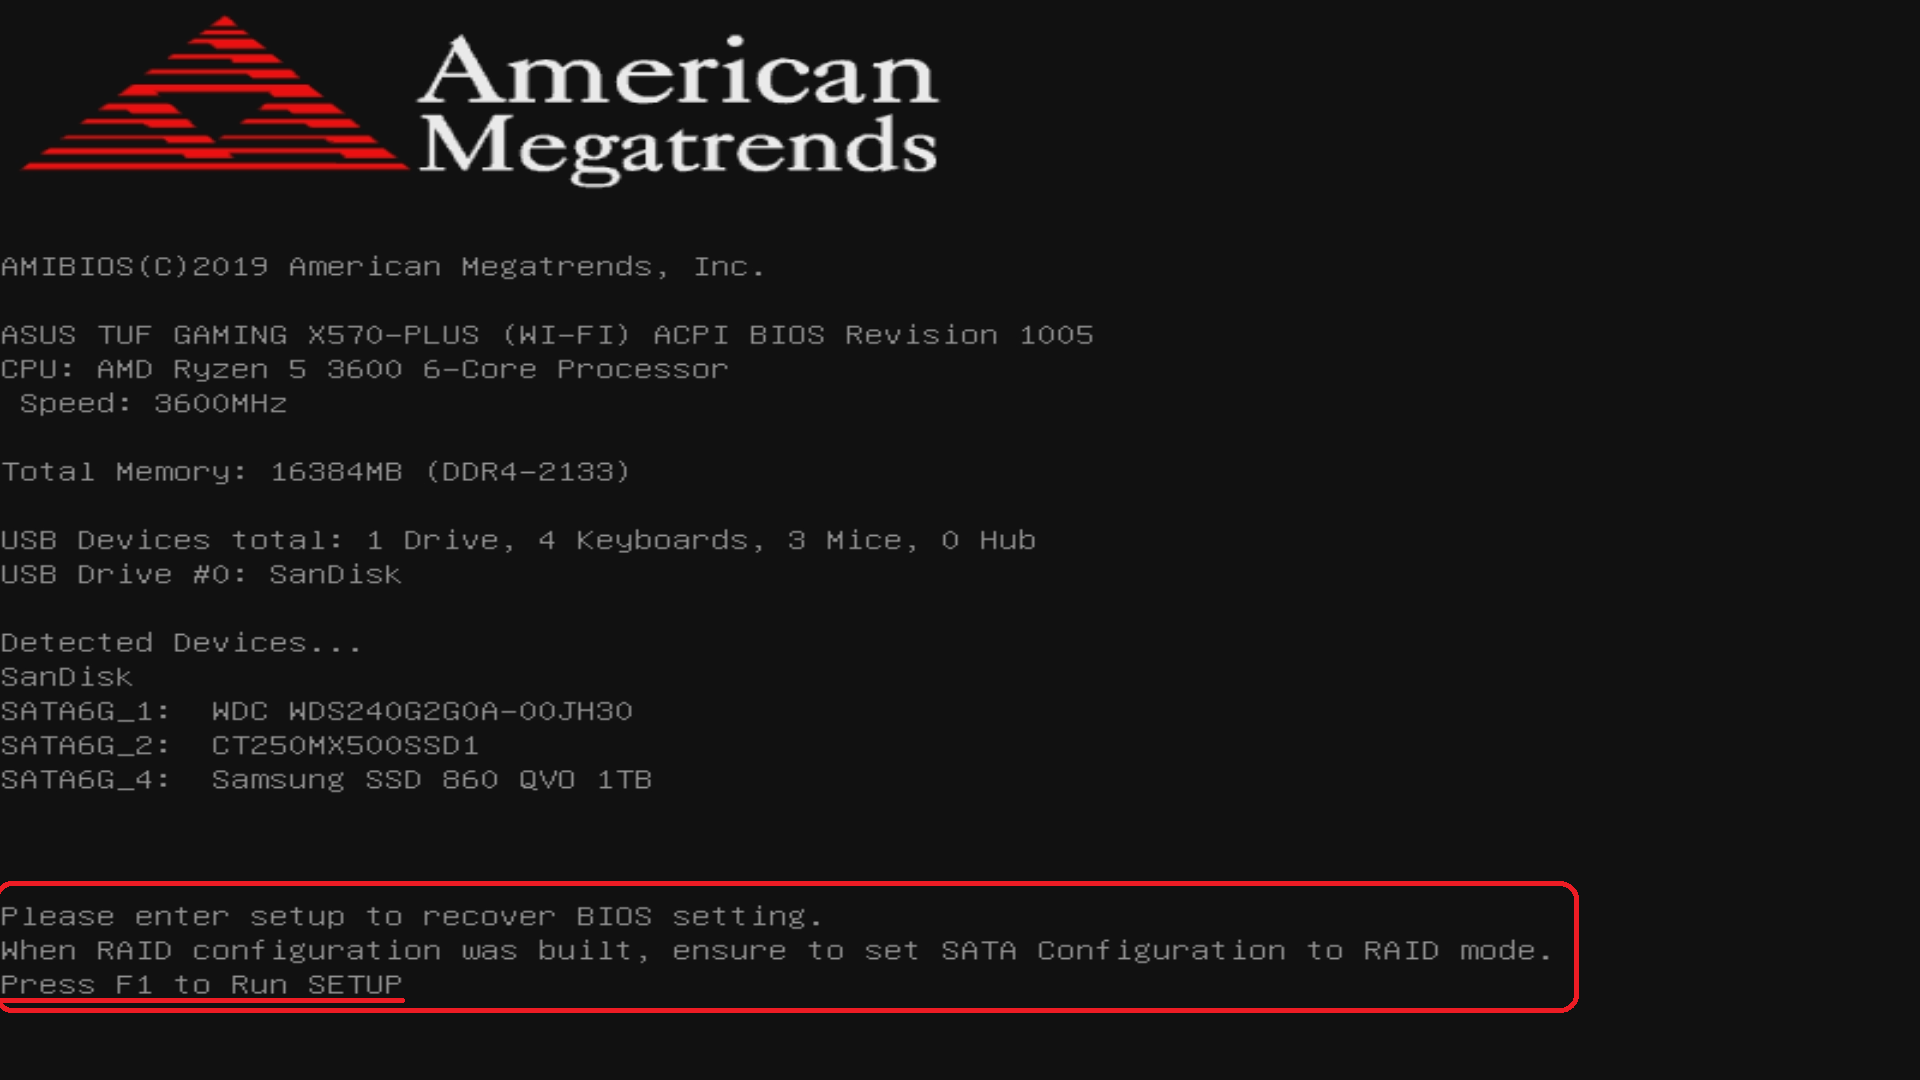
Every computer has a BIOS/CMOS battery that keeps the clock running and a few pre-Windows settings for the computer to set properly. As computers age, this battery inevitably runs out of charge and needs to be replaced. Normally, when the battery runs out of charge, the computer will present a generic error saying "Please enter setup to recover settings."
Below is a simple guide on how to change the BIOS/CMOS battery in your Redbird Training Device.
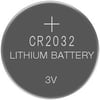
BIOS/CMOS batteries are generally model CR2032 "Coin Cell" batteries, but you should confirm the model of the existing battery inside your computer before sourcing an appropriate replacement.
Overview
- Open your Redbird AATD, TD/TD2 or Insight, or Jay/Velocity computer
- Find and replace the BIOS/CMOS battery
- Set BIOS settings to Redbird Factory Defaults
1. How to open the computer
Below are steps and instructions on how to open the computer for your Redbird flight simulator. You should always turn off your computer before working on/inside it. Be mindful of static, and ground yourself before working on/inside any computer.
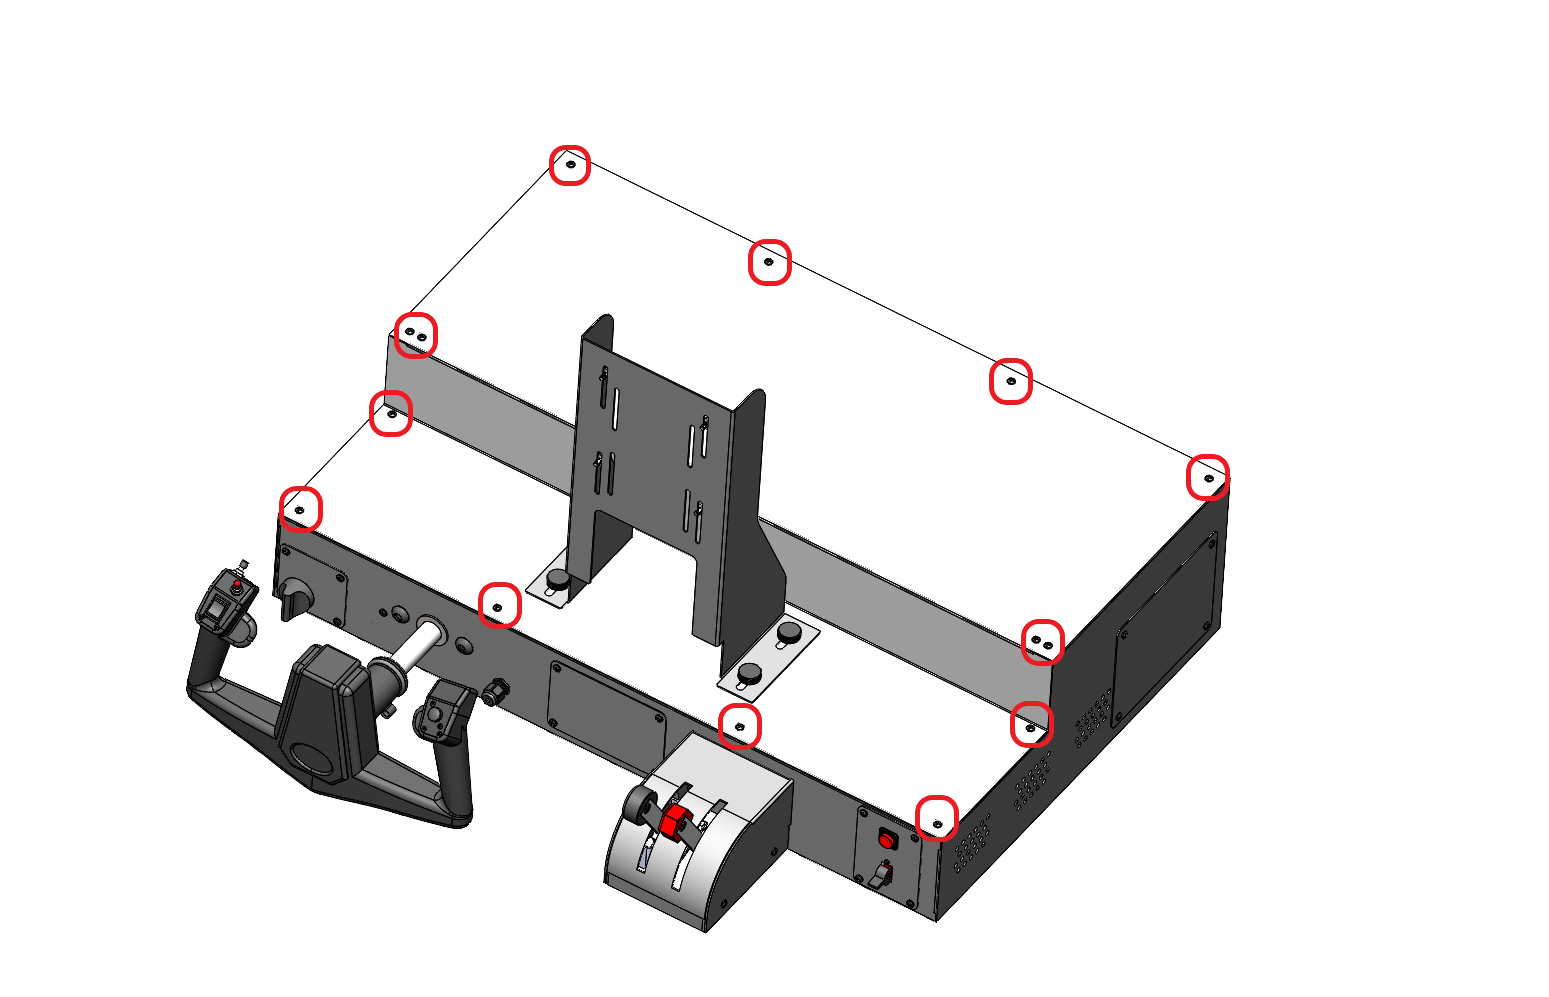
Redbird AATD computers:
- Remove any bolts holding the computer chassis to the stand/frame beneath it. Not all computers are bolted to the frame; disregard if there are no bolts to remove for this step.
- Remove the screws securing the lid to the chassis; there will be between two and six screws securing the lid. You may need to slide the computer chassis forward or lift it up out of the stand/frame in order to see the screws.
- Once the screws have been removed, slide the lid backward (towards the cables), then lift up on the lid to remove.
- Proceed to Finding and replacing the BIOS/CMOS battery section.
Redbird TD/TD2 & Redbird Insight computers:
- Remove the two screws on the side of the computer chassis farthest from where the cables are connected.
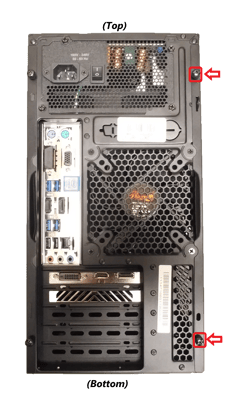
- Once the screws have been removed, slide the side of the chassis backward, then lift up to remove.
- Proceed to Finding and replacing the BIOS/CMOS battery section.
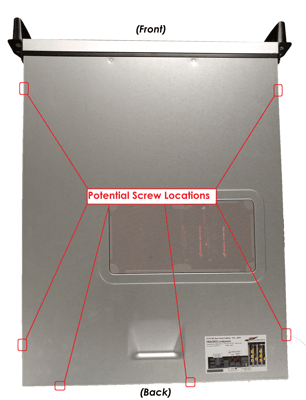
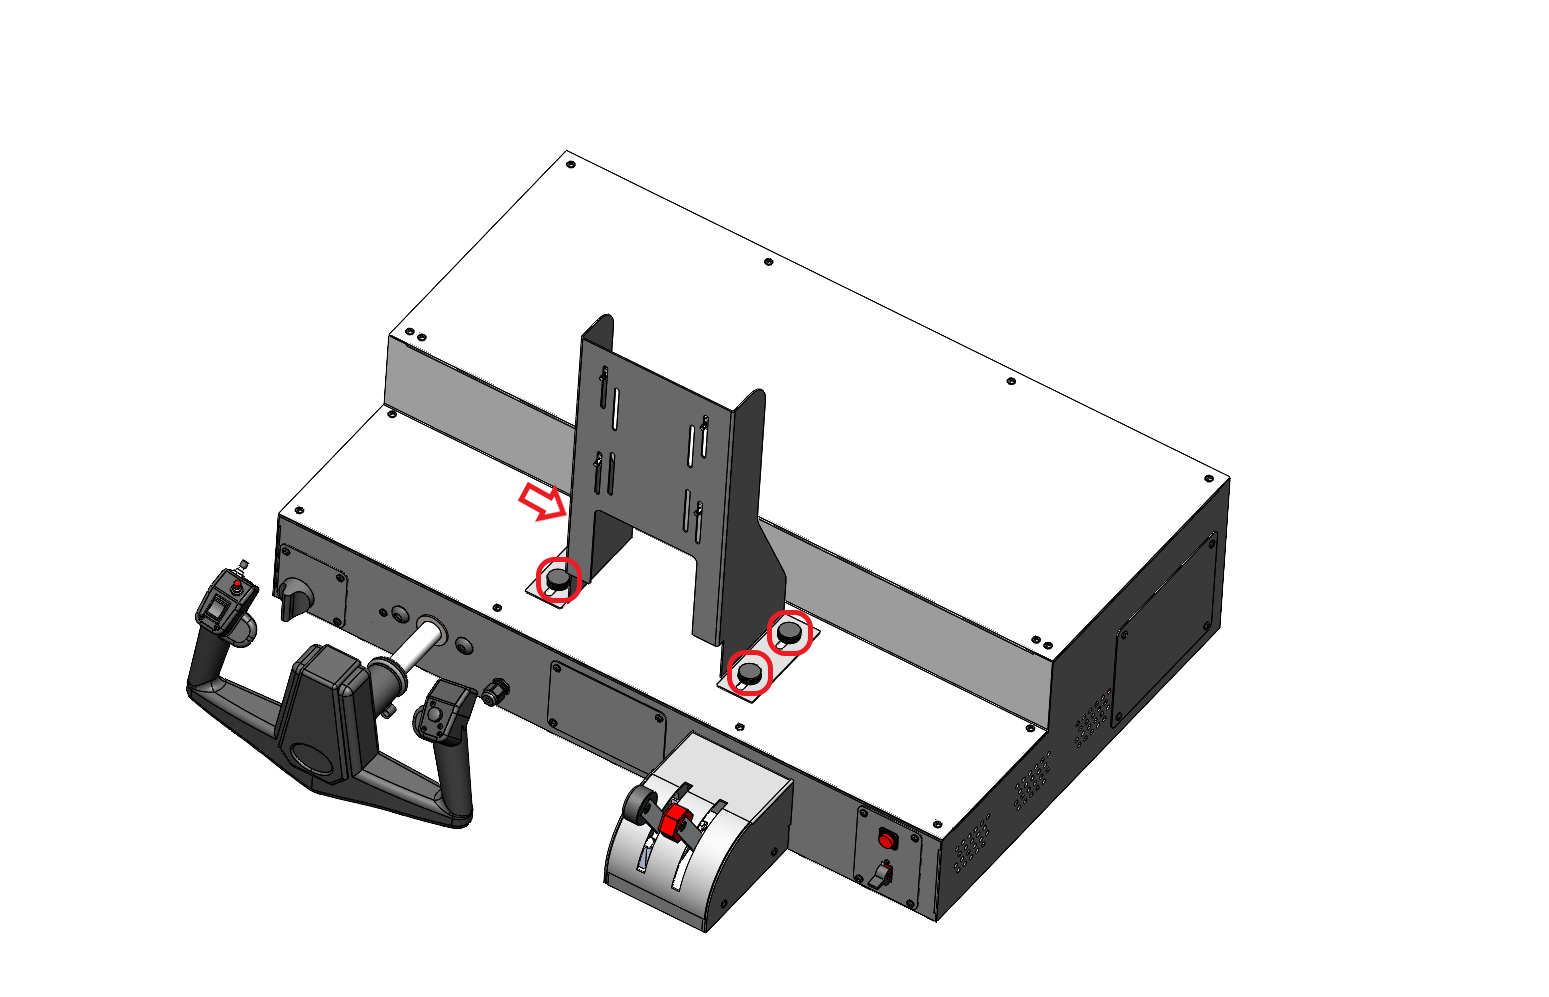
Redbird Jay/Velocity computers:
- Remove the thumbscrews securing the monitor mount to the unit, then remove the screen/monitor and set it to the side. Be careful not to scratch or damage the screen/monitor.
- Remove the screws securing the lid to the top of the unit.
- Once all screws have been removed, lift up on the lid to remove, then set it aside. The lid on the latest model systems is split into two "halves," but the instructions remain the same.
2. Finding and replacing the BIOS/CMOS battery
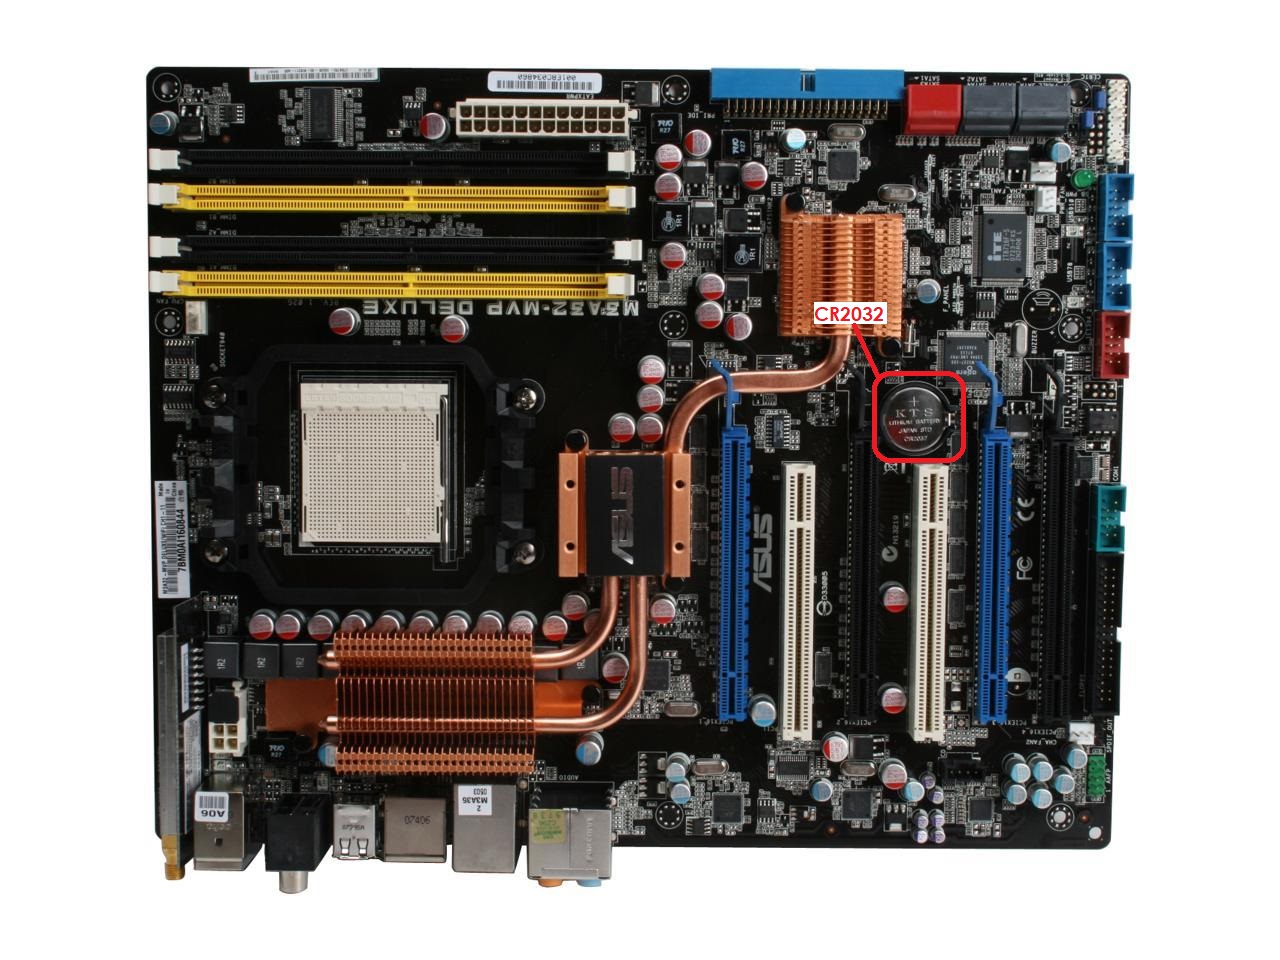
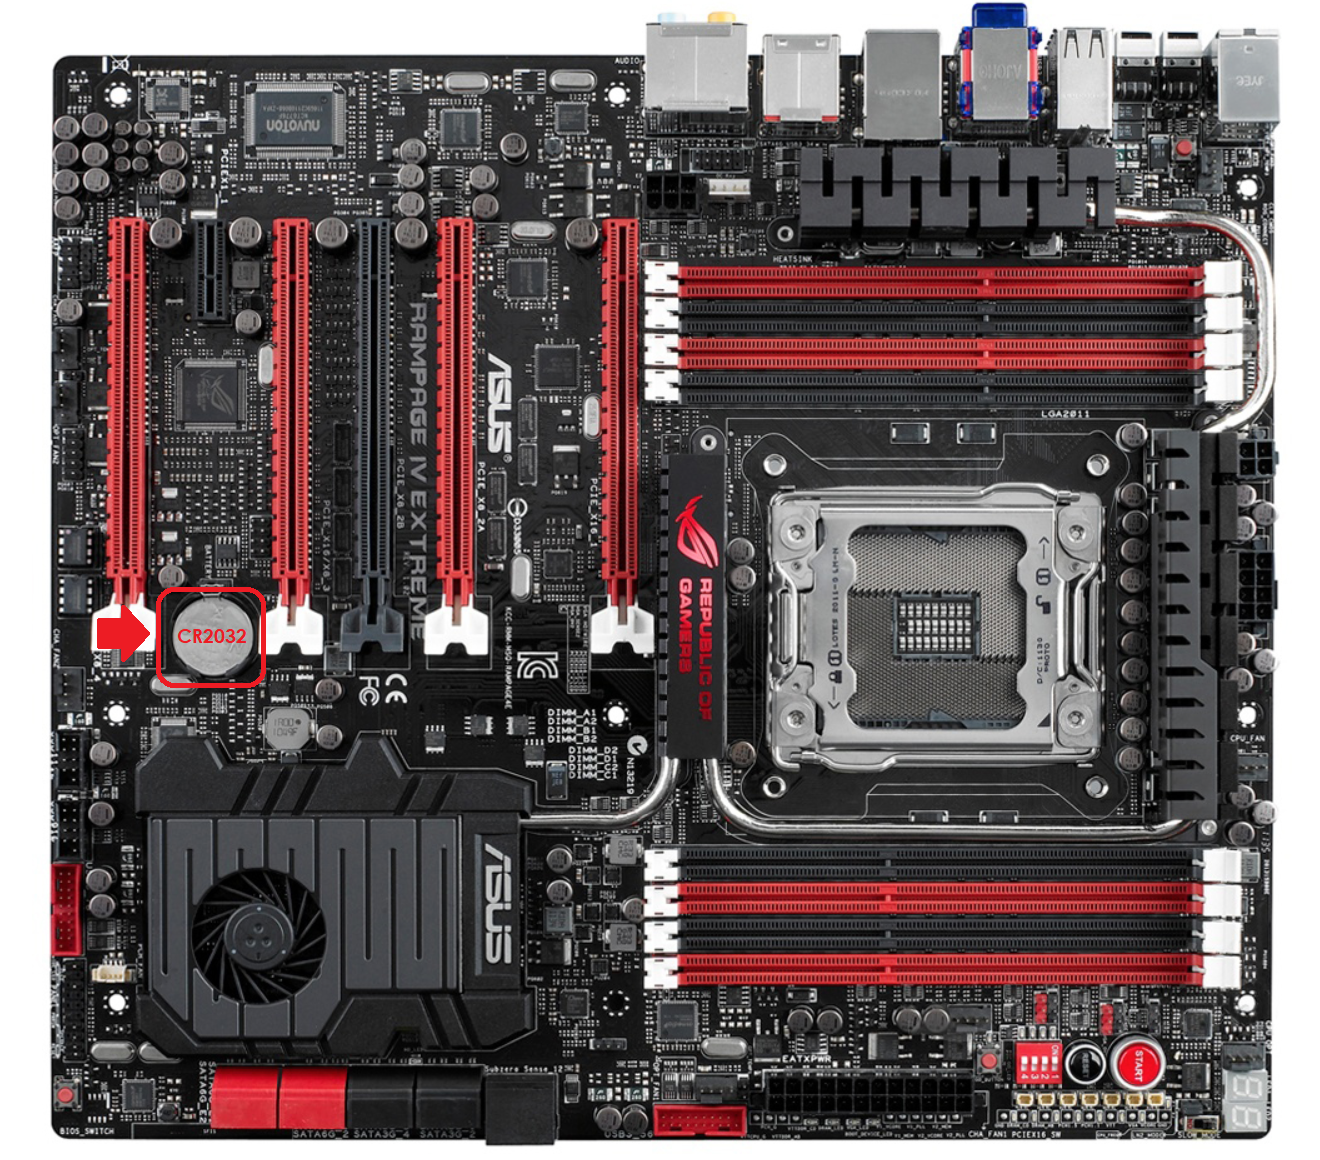
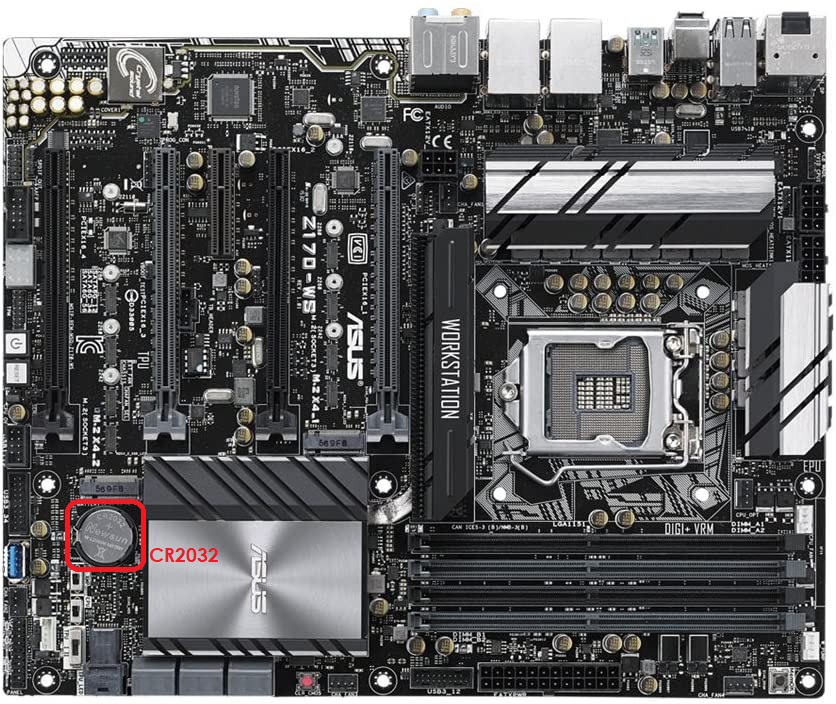
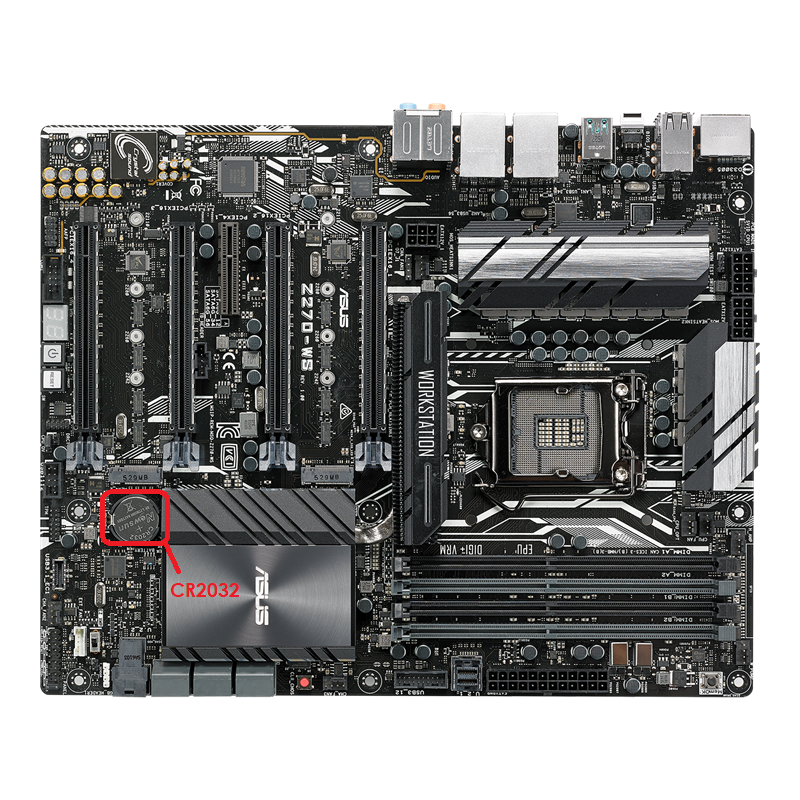
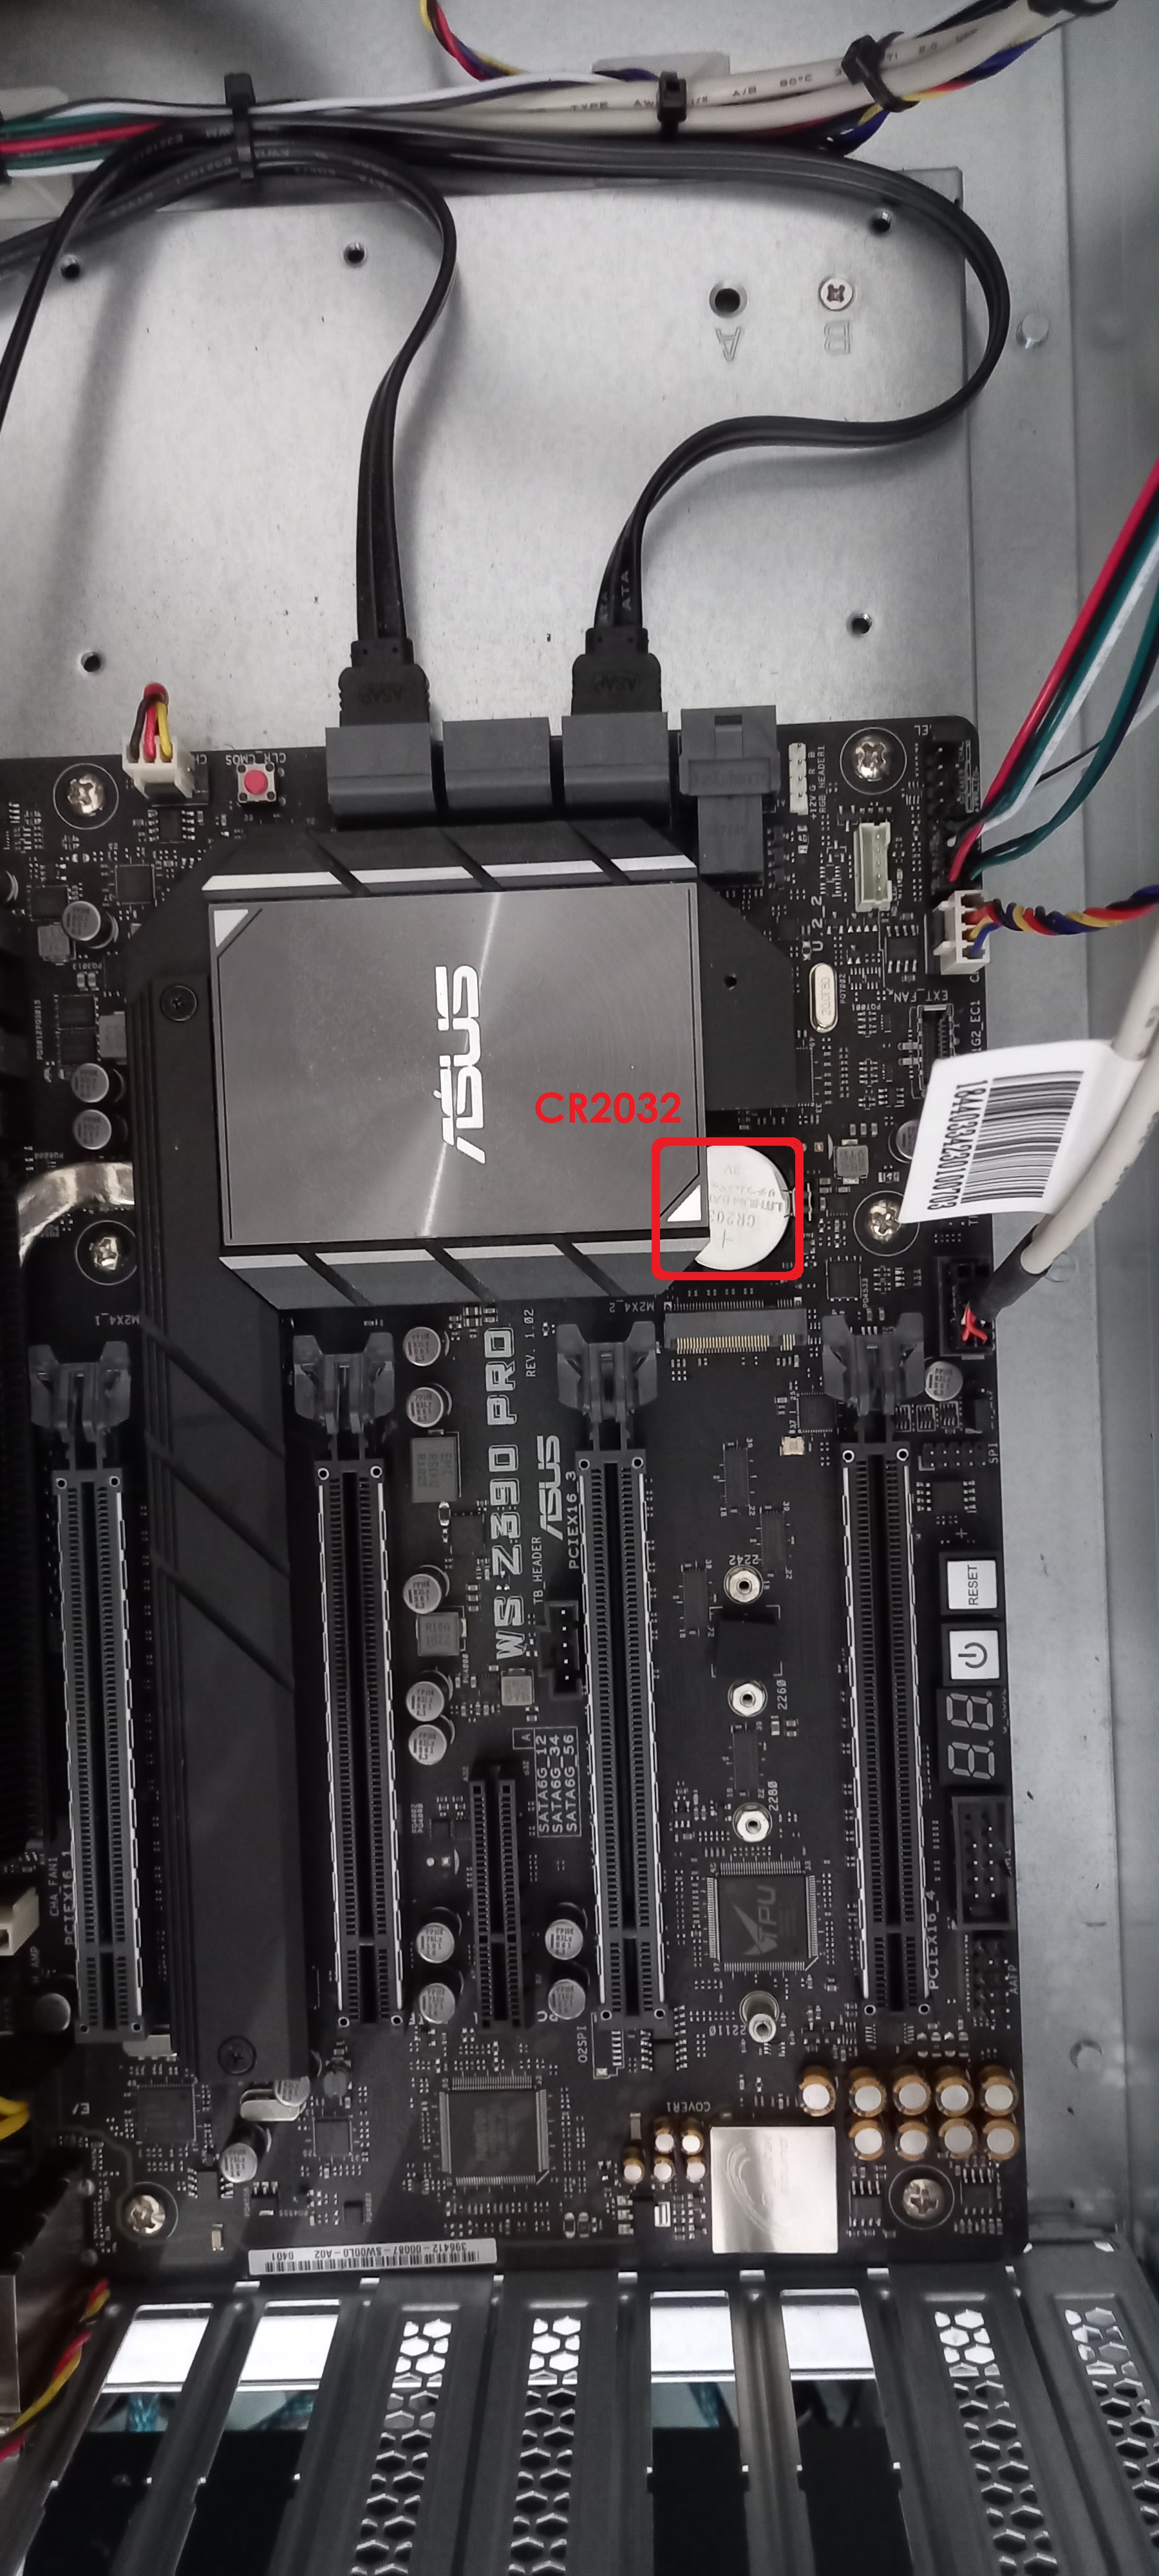
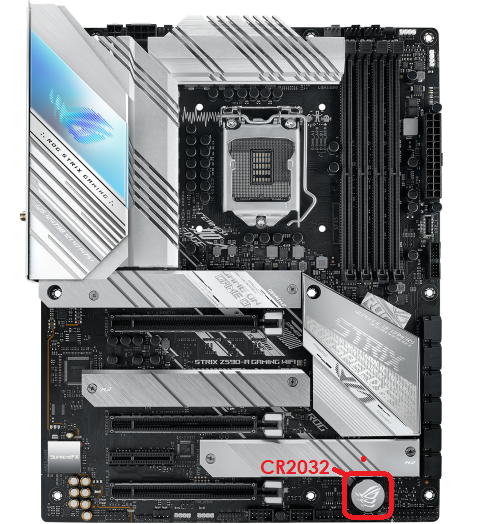
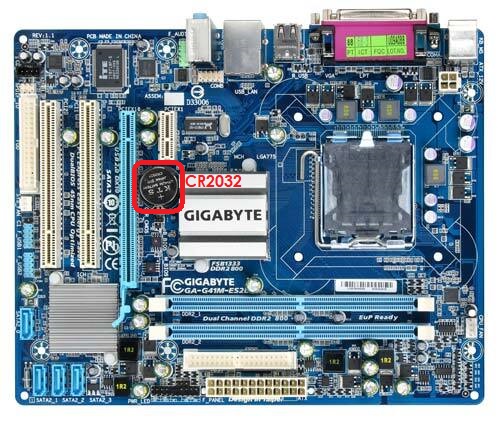
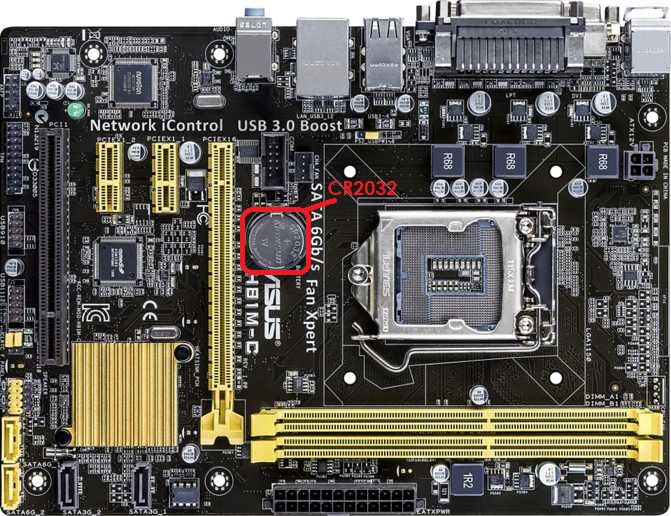
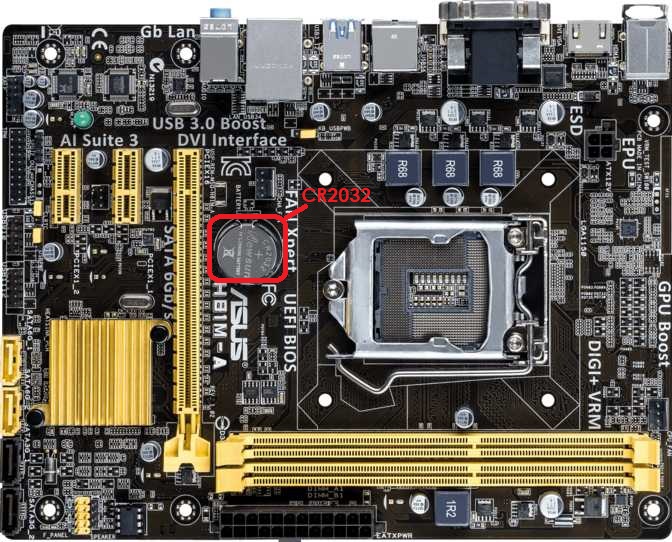
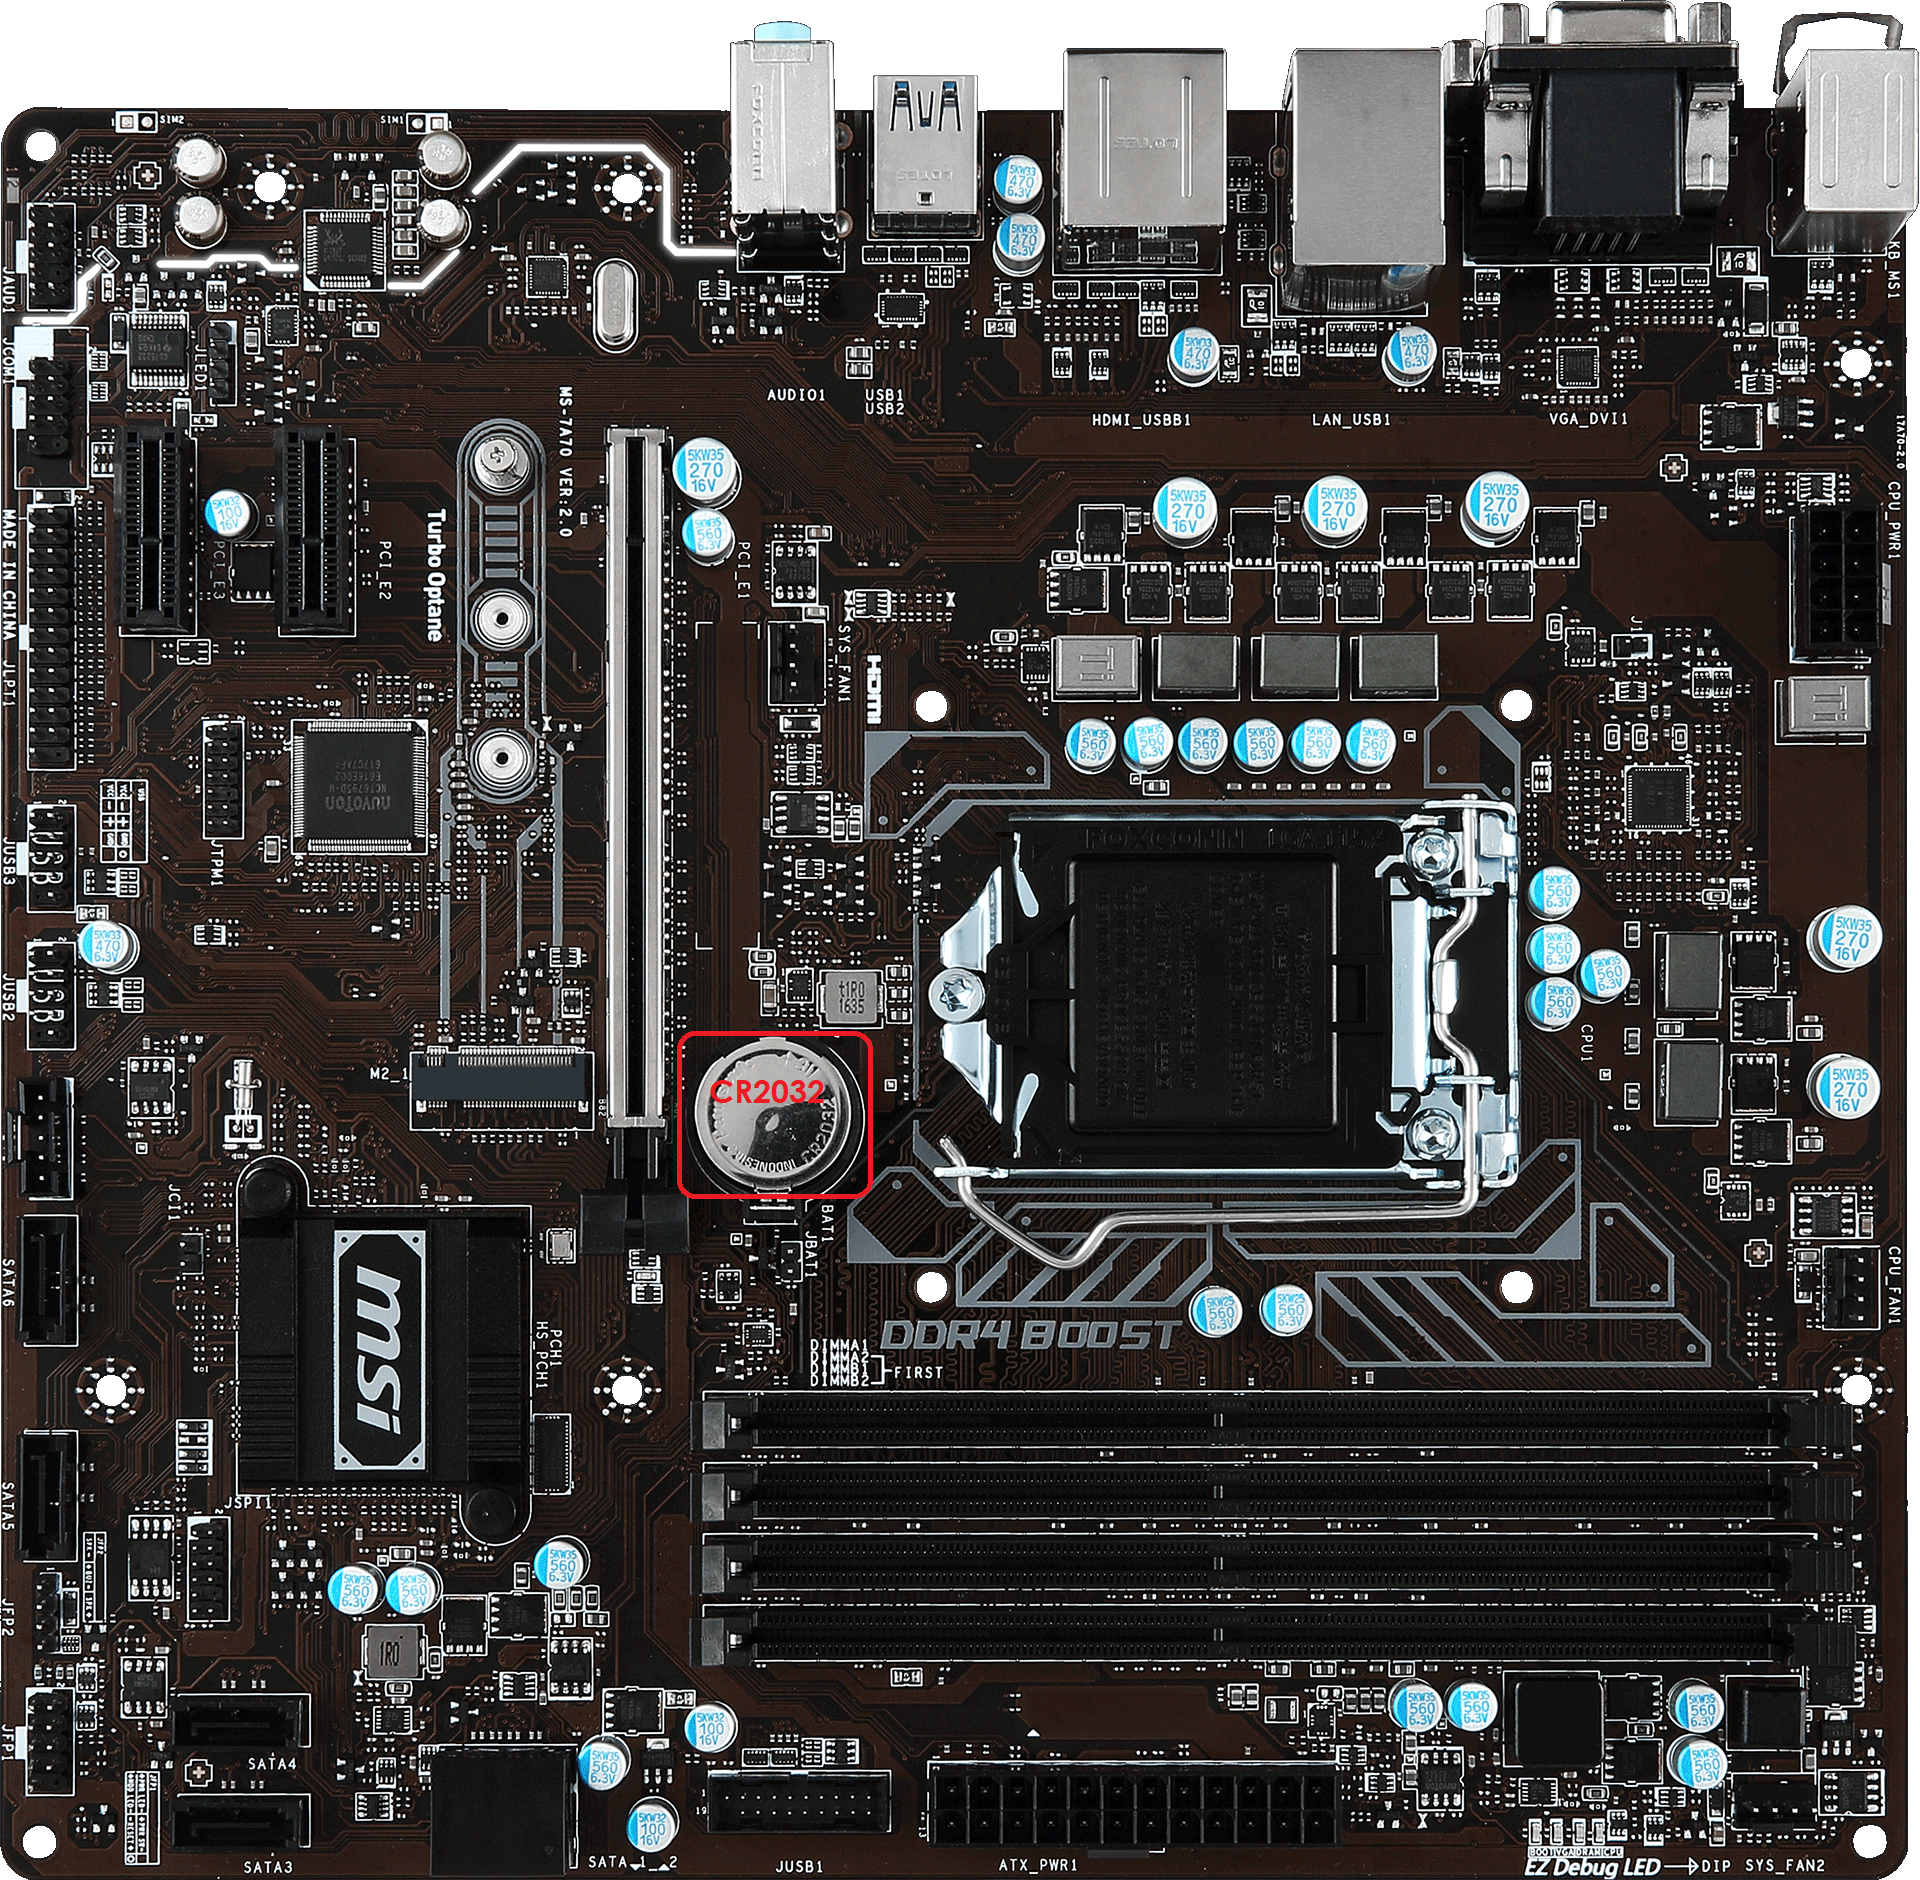
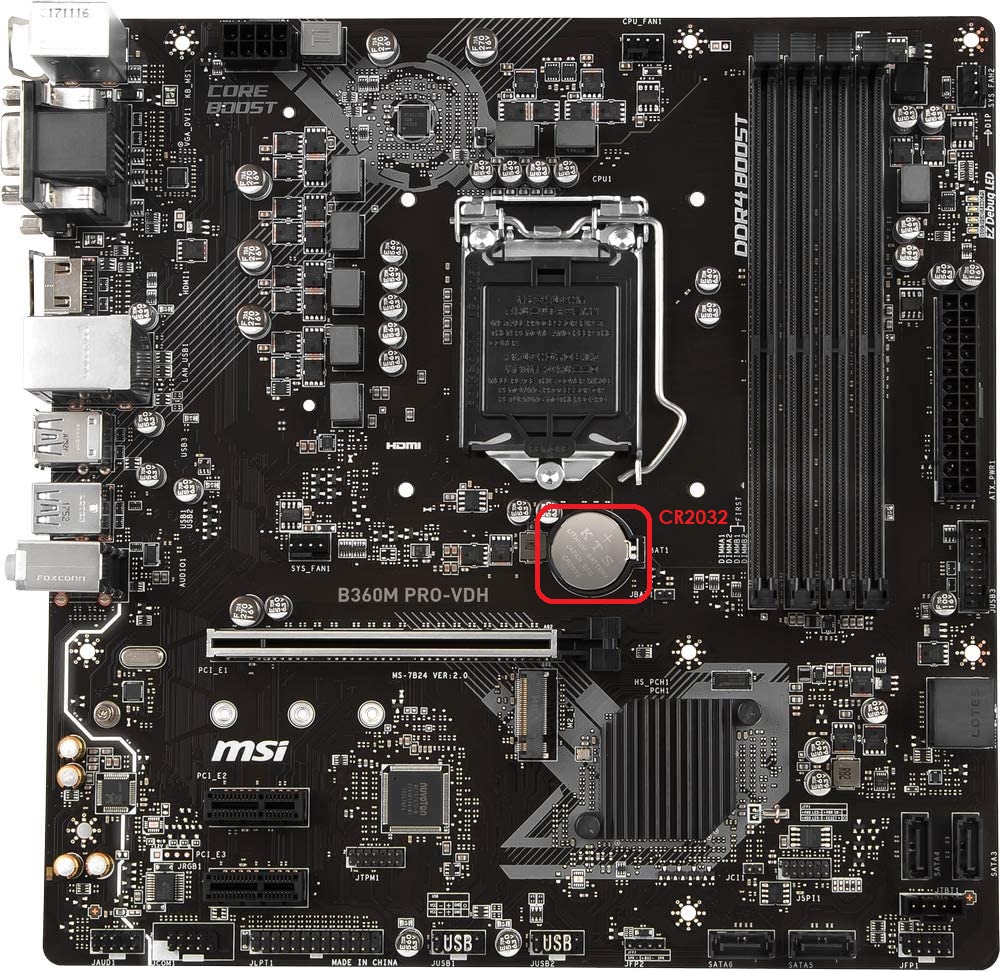
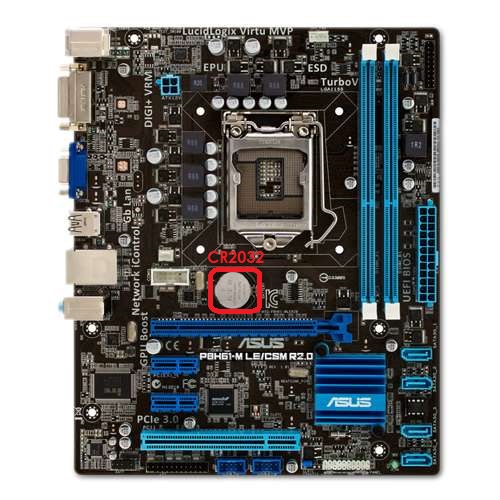
Generally, the BIOS/CMOS battery is placed fairly prominently on the motherboard for easy access, but sometimes it gets hidden by other components or heatsinks, so it may take some effort to find.
Once you find the battery, swapping it out should be fairly straightforward. There's a small plastic slot built into the motherboard to hold the battery, with a metal clip or tab on one side holding the battery down. Press the clip or tab to allow the old battery to be removed, then insert and press down on the new battery to secure it to the motherboard.

Once the BIOS/CMOS battery has been replaced, proceed to the section on Redbird Default BIOS Settings for further instructions.
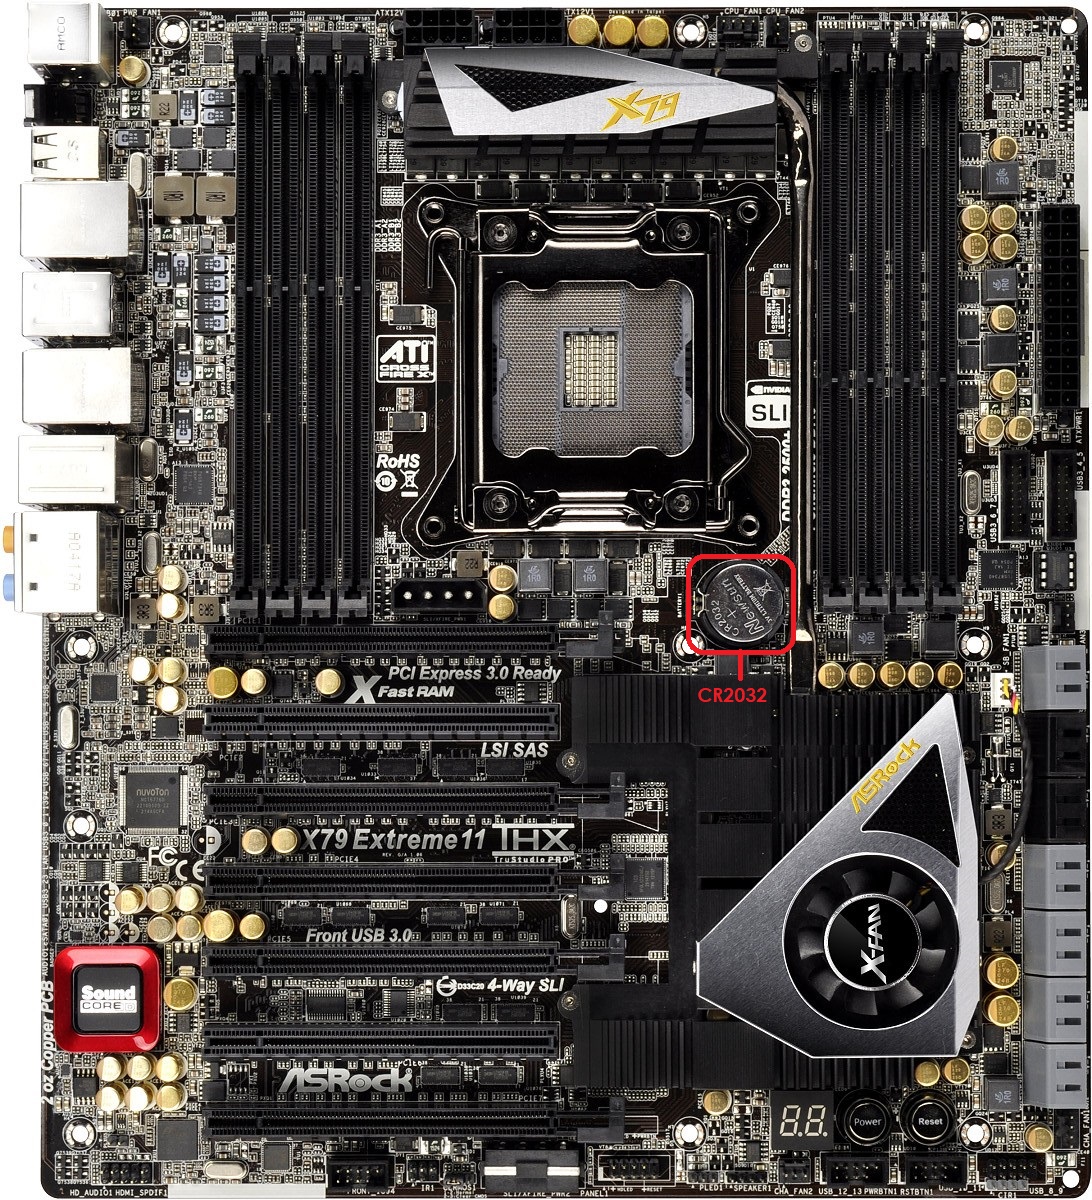
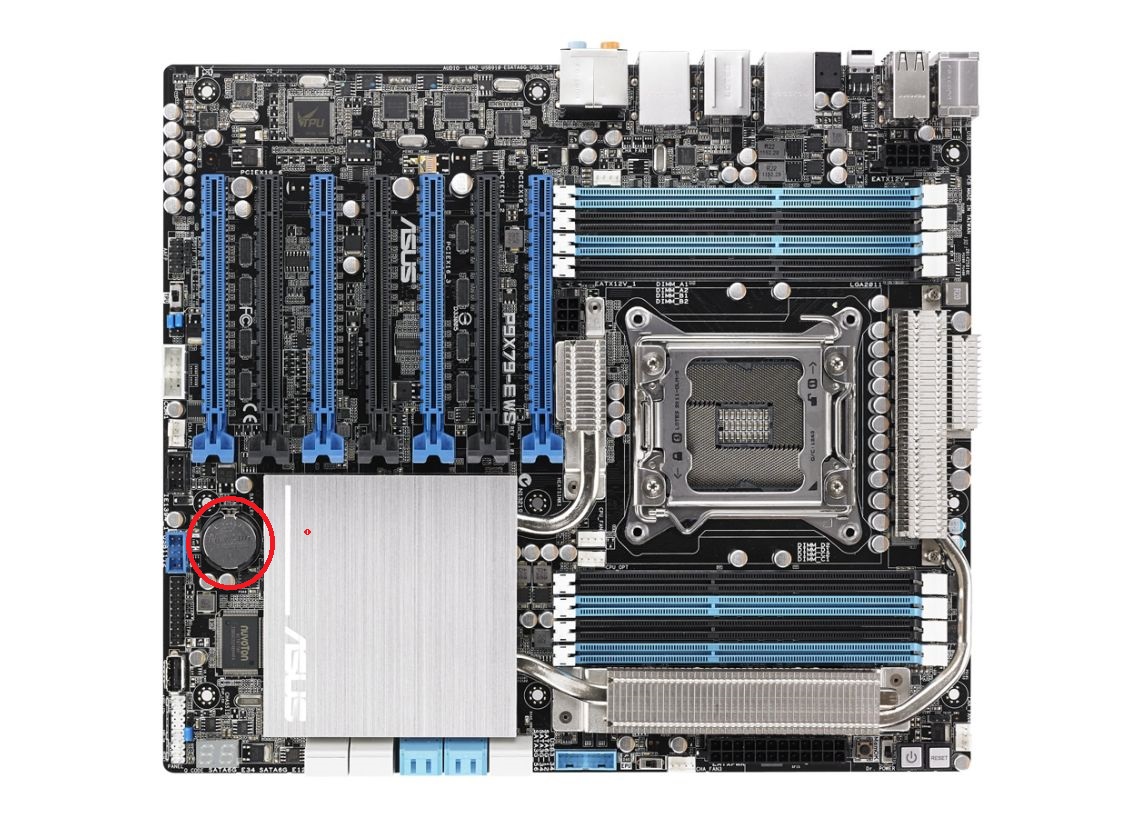
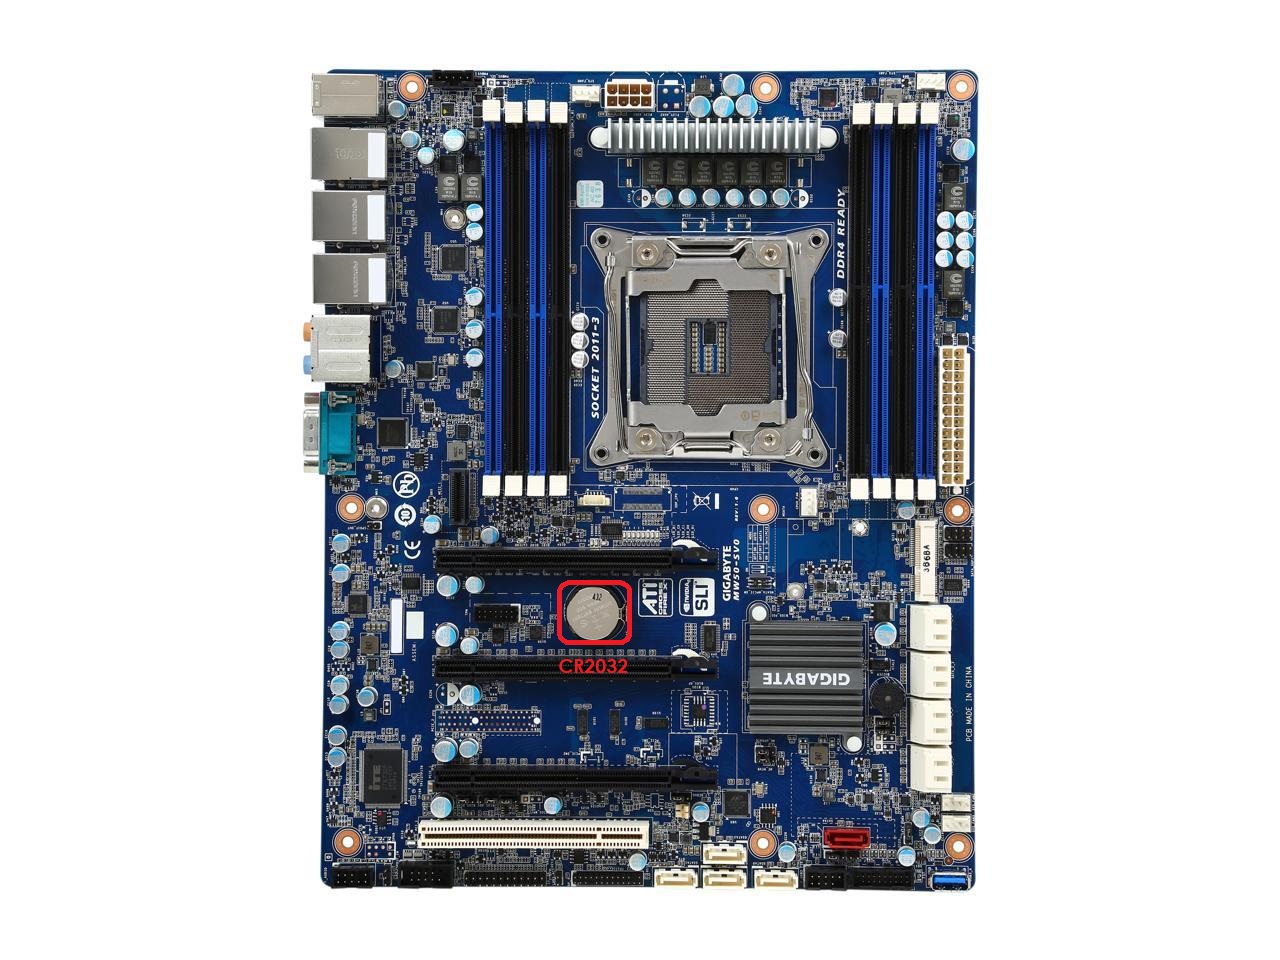
Below are some pictures of where to locate the BIOS/CMOS battery depending on the model of the computer on your Redbird.
AATD computer motherboards:
| Model F01 | M3A32-MVP |
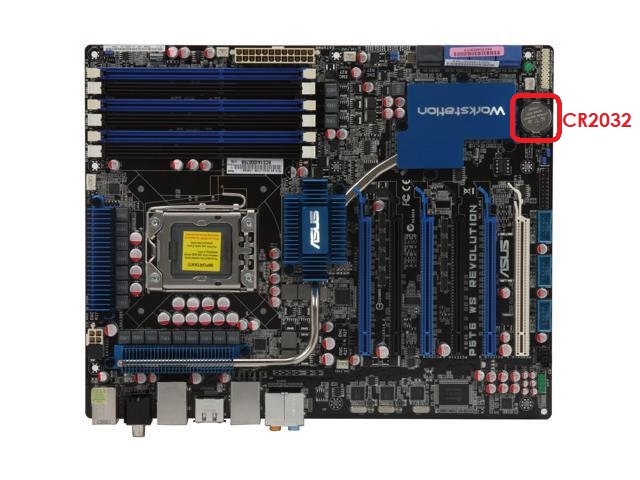
| Model F02 | P6T6 WS |
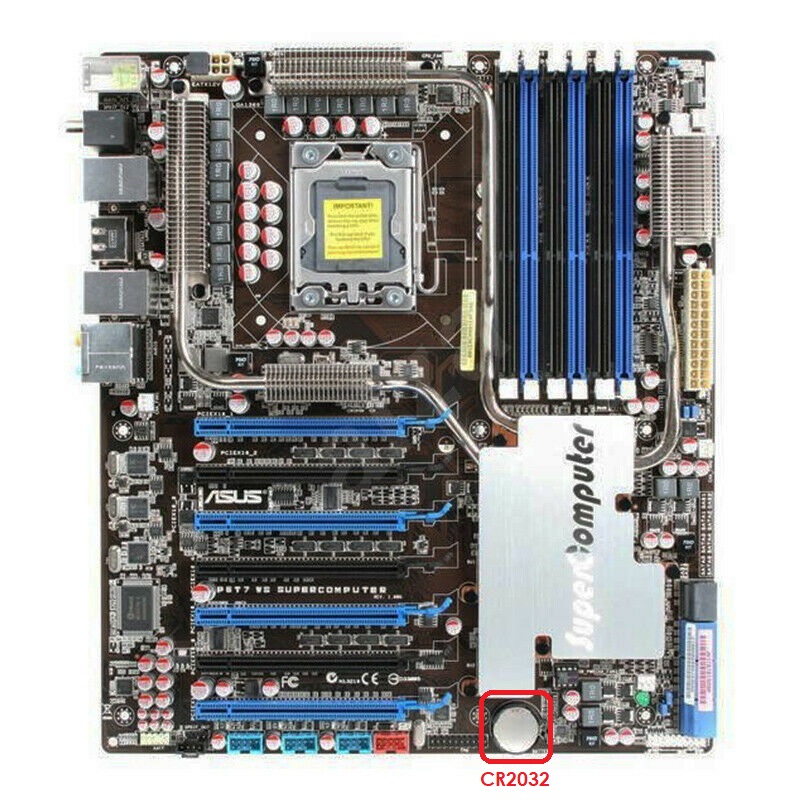
| Model F03 | P6T7 WS |
| Model F04 | Rampage IV Extreme |
| Model F05 | X79 Extreme 11* |
| Model F06 | P9X79-E WS* |
| Model F07 | P9X79-E WS* |
| Model F08 | MW50-SV0 WS* |
| Model F09 | Z170 WS* |
| Model F10 | Z270 WS* |
| Model F11 | Z390 WS* |
| Model F12 | Z390 WS* |
| Model F13 | Z590-A* |
| Model F14 | Z790-A* |
*The BIOS/CMOS battery may be hidden underneath the video cards inside your computer, depending on the model. You may need to remove the video cards before you can access the battery.
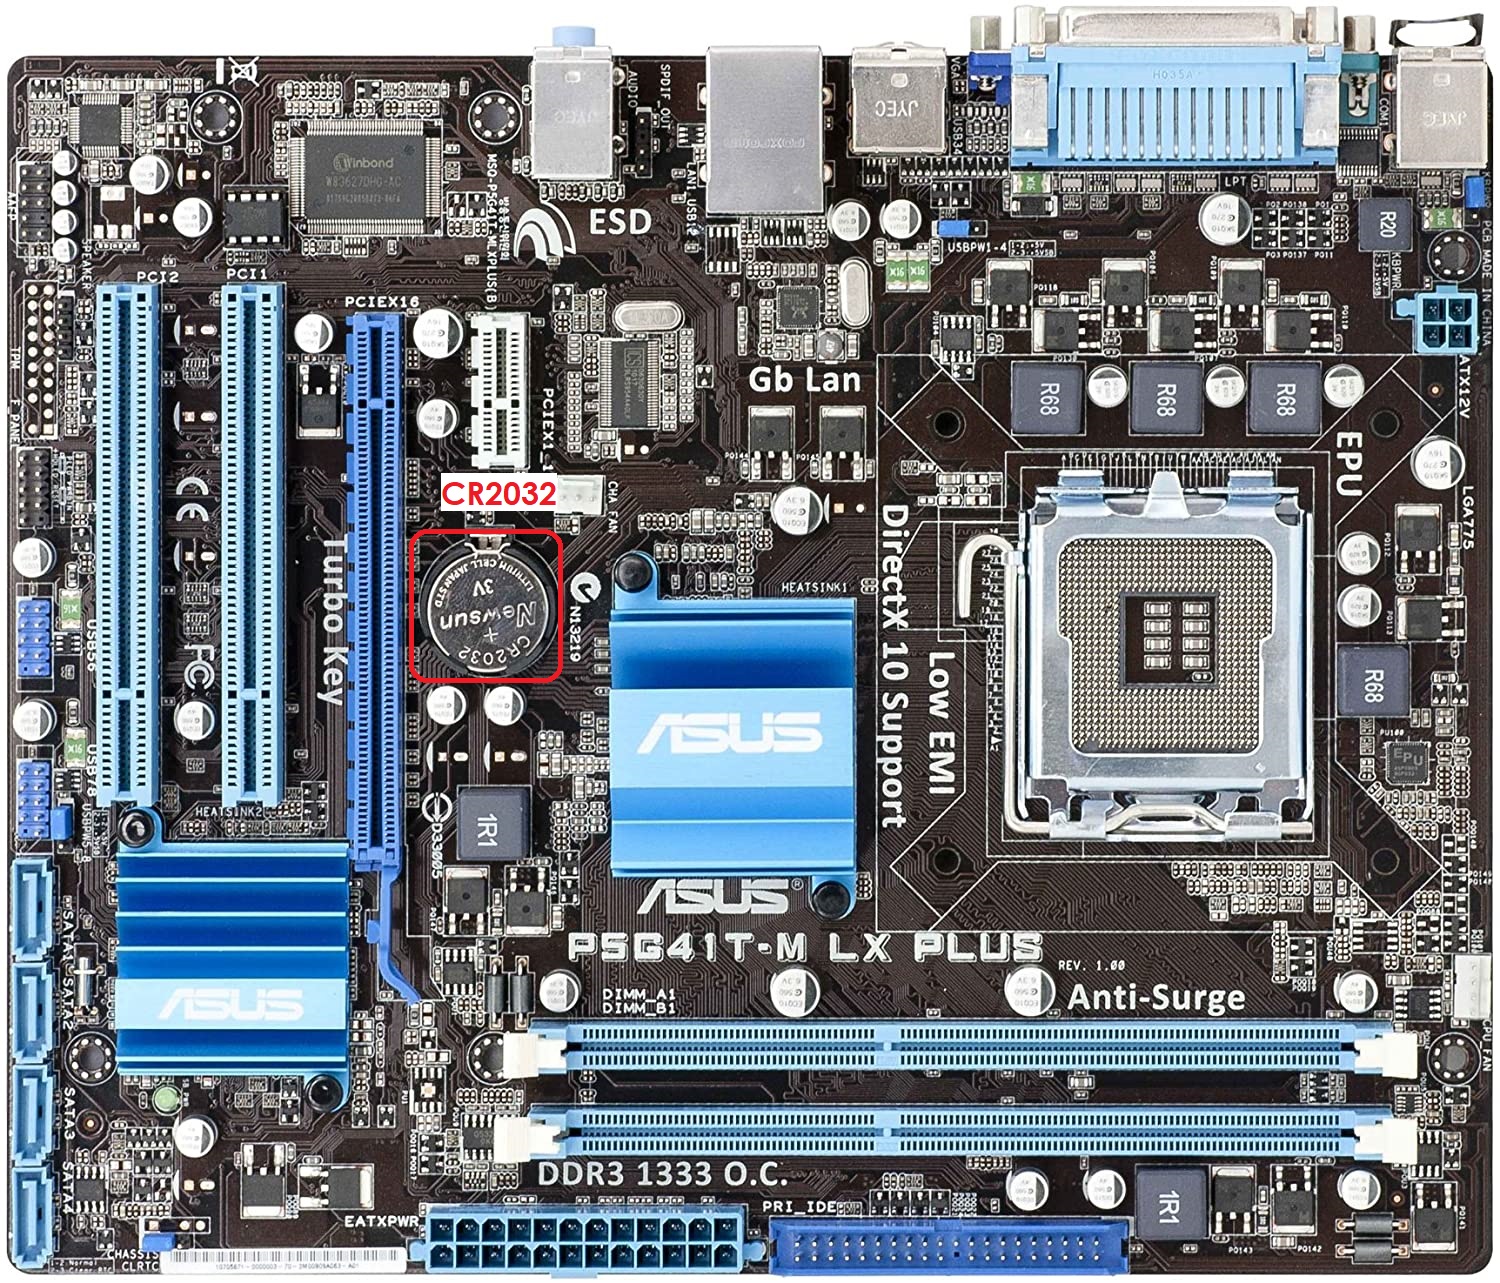
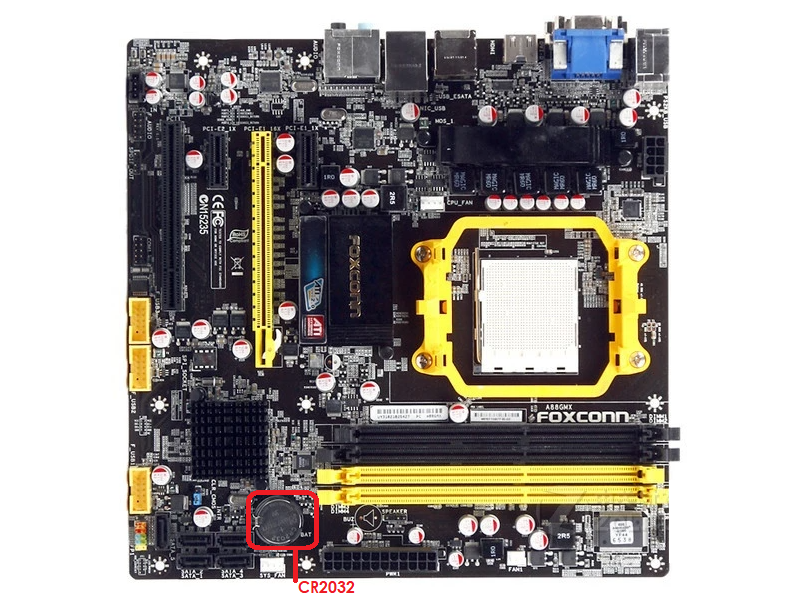
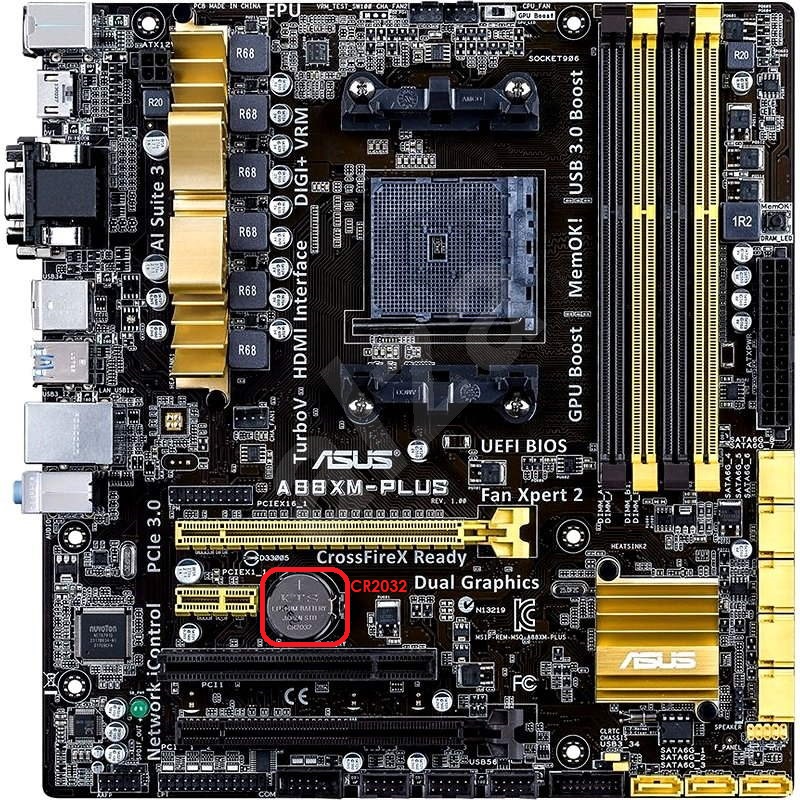
Redbird TD/TD2 computer motherboards:
| Model T01 (a) | GA-G41M-ES2L |
| Model T01 (b) | P5G41T-M LX Plus |
| Model T01 (c) | A88GMX |
| Model T01 (d) | A88XM-Plus |
| Model T02 (a) | H81M-C (-C/CSM) |
| Model T02 (b) | H81M-A (-C/CSM) |
| Model T03 & T04 | B250M-A (-PRO VDH) |
| Model T05 | B360M-C (-PRO VDH) |
| Model T06 | B360M-C (-PRO VDH) or B460M-C |
| Model T07 | B460M-C or B560M-A |
| Model T08 | B660M-A-D4* |
| Model T09 | B660M-A-D4* |
*The BIOS/CMOS battery includes a wire harness and connector and plugs into the motherboard. It may be necessary to remove the heatsink covers to expose the CMOS battery plug.
Redbird Insight computer motherboards:
| Model I00 | P8H61-M LE/CSM R2 |
| Model I01 | H81M-C (-C/CSM) |
| Model I02 | H81M-A (-C/CSM) |
| Model I03 | B250M-A (-PRO VDH) |
| Model I05 | B360M-C (-PRO VDH) |
| Model I06 | B360M-C (-PRO VDH) |
| Model I08 | B660M-A D4* |
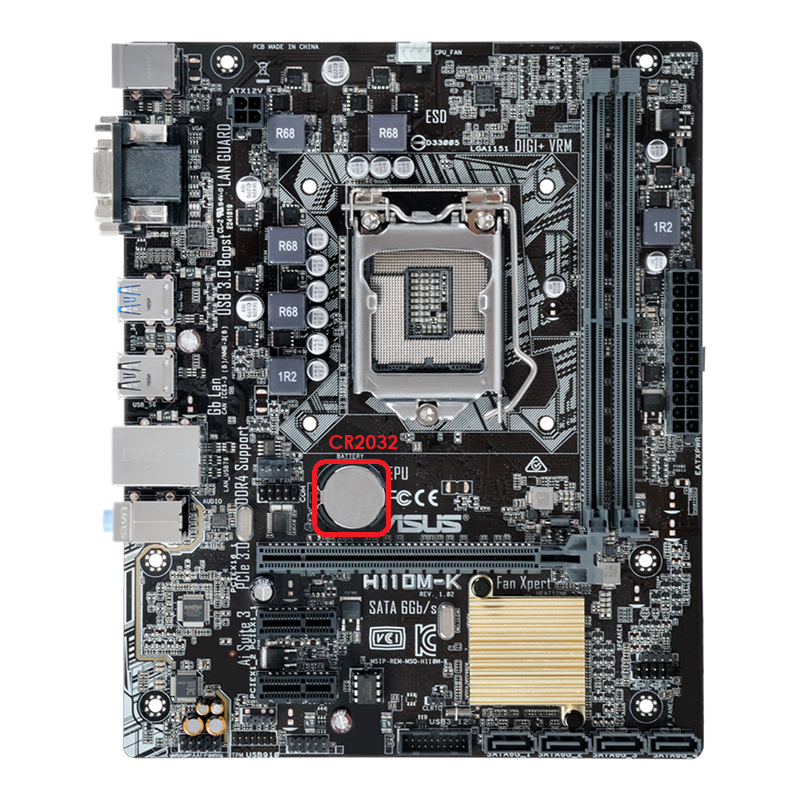
Redbird Jay/Velocity computer motherboards:
| Jay Motherboards | |
| Model J01 (Legacy) | F2A85-M Pro |
| Model J02 | A88GMX |
| Model J03 | A88XM-Plus |
| Model J04 | H81M-C (-C/CSM) |
| Model J05 | H81M-A (-C/CSM) |
| Model | H110M-K |
| Model J02/J03 | B250M-A (-PRO VDH) |
| Model J04/J05 | B360M-C (-PRO VDH) |
| Model J06 | B460M-C/CSM or B560M-A |
| Model J07/J08 | B660M-A-D4* |
| Jay Velocity Motherboards | |
| Model V05 | B360M-C/CSM |
| Model V06 | B360M-C/CSM |
| Model V07 | B460M-C/CSM or B560M-A |
| Model V08 | B660M-A D4* |
| Model V09 | B660M-A D4* |
*The BIOS/CMOS battery includes a wire harness and connector and plugs into the motherboard. It may be necessary to remove the heatsink covers to expose the CMOS battery plug
3. Set Redbird Factory Default BIOS Settings
After swapping out the BIOS/CMOS battery, there are a couple of pre-Windows settings in the BIOS menu that need to be reset to Redbird Factory Defaults.
The pictures referenced in the steps below may or may not match your system exactly, but the names of the settings and their locations should be fairly similar.
- Enter the BIOS/Setup menu by pressing the Delete key on your keyboard while the computer is booting up, or press the corresponding key on the "Please enter Setup and recover BIOS settings" error screen (usually F1).
- Enter Advanced Mode (if not there automatically) by pressing F7, then Enter.

- Navigate to the BOOT tab in the Advanced Mode settings menu (using the Arrow keys or Mouse).
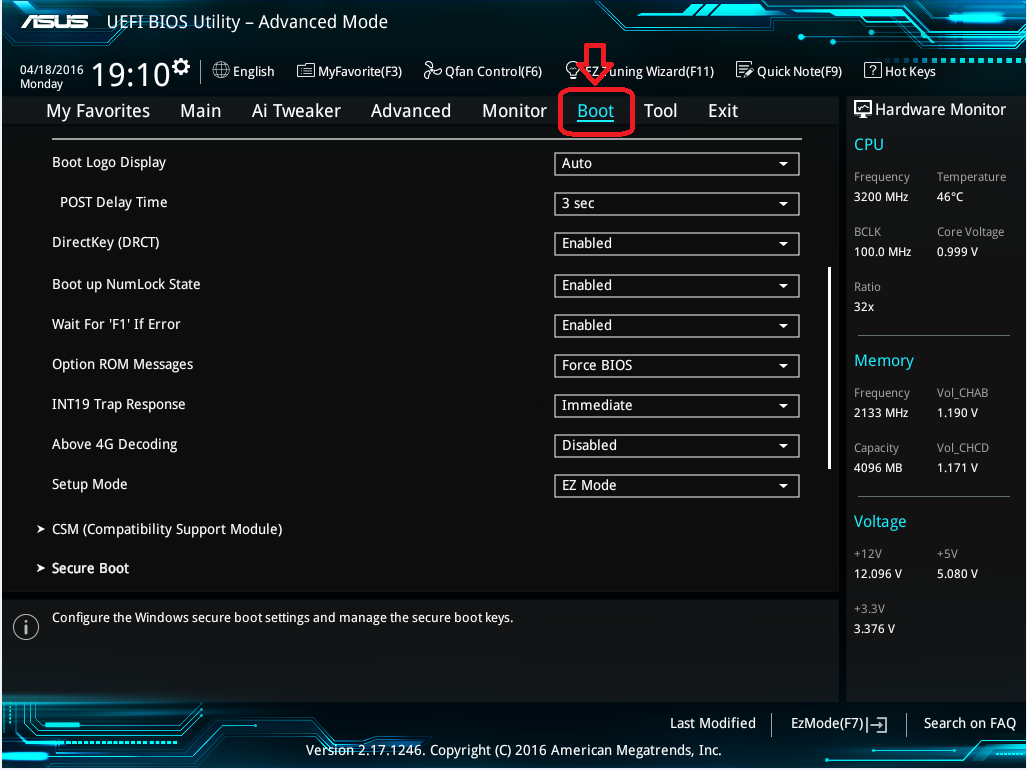
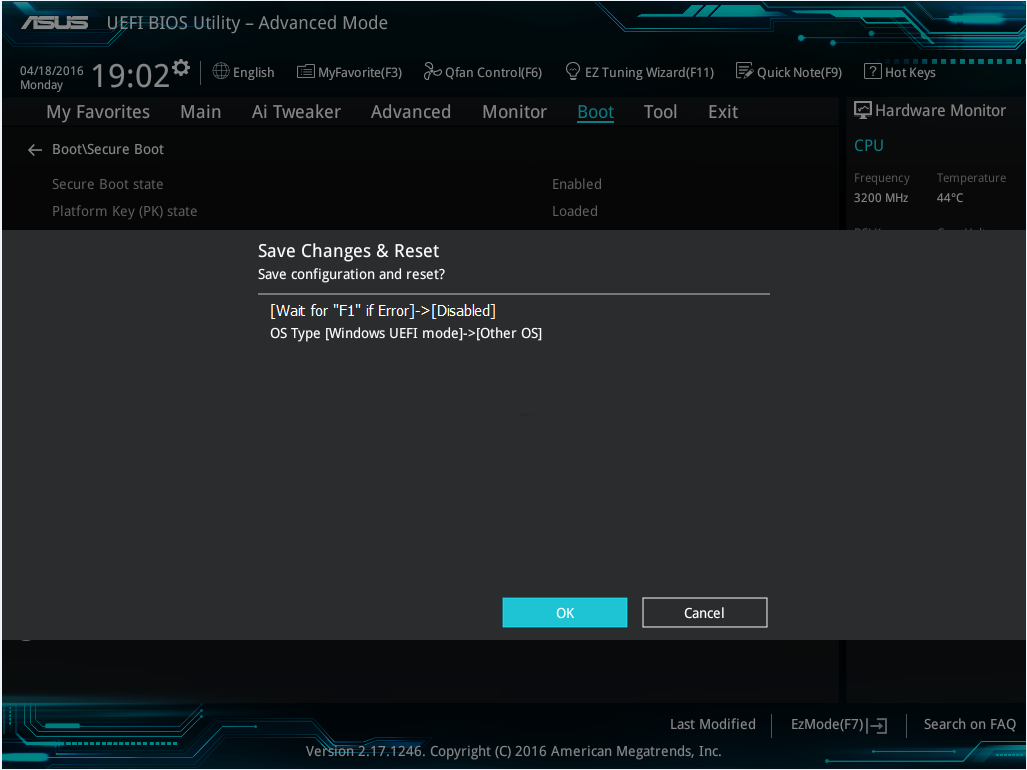
- *Change the Wait for "F1" If Error setting to Disabled

*This setting may be beneath a "Boot Configuration" sub-menu. - *Enter the Secure Boot section, and make sure that it's set to Other OS.
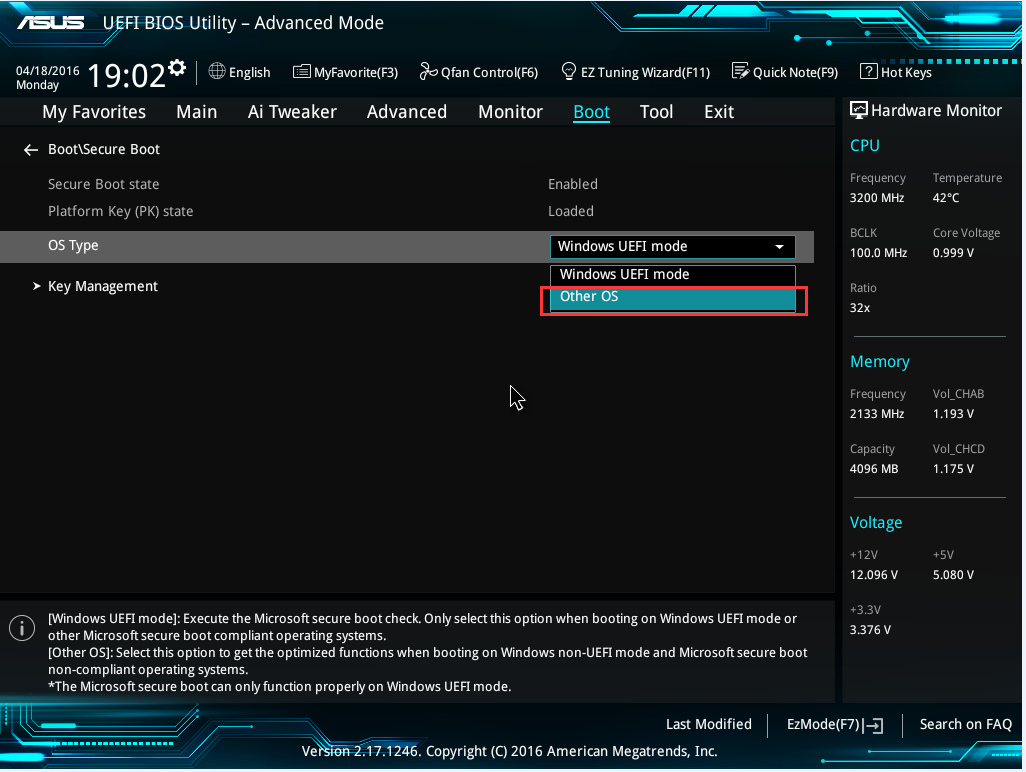
*This setting may be beneath a "Boot Configuration" sub-menu - Press the "F10" key to save (then press "Enter" or click OK to confirm) changes to the BIOS, and reboot the computer.
- The system should reboot normally into Windows.
If you're having trouble after referencing the guide above, contact Redbird Support for assistance.