Glossary | Power-up sequence | Power-down sequence | Basic troubleshooting
Basic operations
NOTE: The circuit for the simulator must be properly grounded and provide the
recommended voltage. Improper grounding or incorrect voltage can cause injuries
and damage to the device. If you have a motion platform, the circuit cannot contain a
ground fault circuit interrupter (GFCI). Redbird is not responsible for damage caused
by improper grounding or improper voltage provided by the facility.
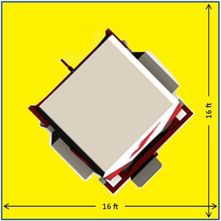
CAUTION: When operating the device, make sure that the area around the simulator
is clear of persons, equipment, or other hazards. Also, be aware of possible pinch points created by simulator movements (if applicable). See the image below for clearance dimensions.
Glossary
Motion platform (MP)
The motion platform provides effective motion feedback for yaw, pitch, and roll. It is comprised of several, linked sub-systems, including:
- Position and acceleration calculations running on the motion system command software installed on the flight simulation computer;
- A control panel with motor drives, logic computer, and testing and calibration controls;
- An electrically driven, gimbaled motion base with three electric motors and two hydraulic safety locks;
- A full range of limit and position sensors.
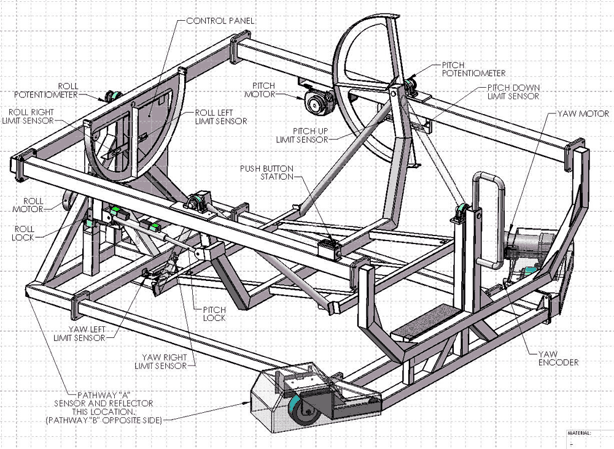
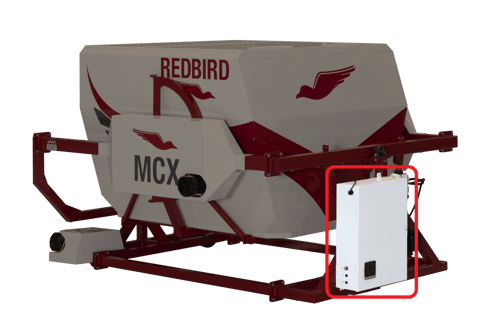
Motion control box
Every motion platform has a motion control box that houses the components that drive the movement of the system. The motion control box is usually mounted either on the front of the frame, on a stand to the side, or underneath the cabin.
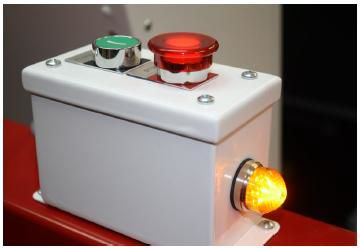
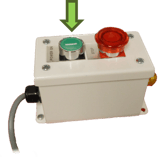
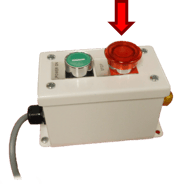
Push-button (PB) station
Each motion platform should have a push-button station mounted either on the frame close to the entrance or on top of the motion control box.
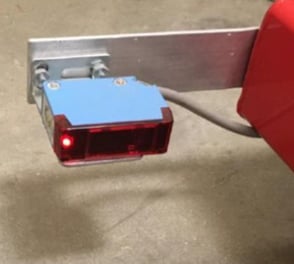
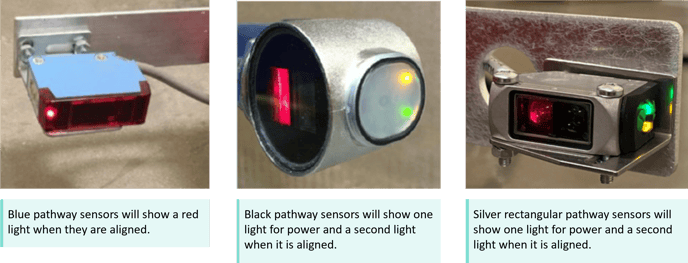
Pathway sensor & pathway reflector
Each motion platform should have a pair of pathway sensors on the front corners and a pair of pathway reflectors on the rear corners. Ensure that each pathway sensor has a clear line of sight to the reflector on that side and that there aren't any objects in the path of the yaw axis.

Power-up sequence
To initialize and run the motion platform when you load a simulation, use the following sequence:
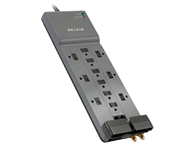
- Turn the surge protector on to provide power to the system. You should hear the cooling fan underneath the floor of the cabin start up.
- Turn the motion platform on by pressing the green button on the push-button station.
When the motion platform turns on it will slowly yaw to the right and then quickly return to the center. Keep people and objects away from the path of the simulator.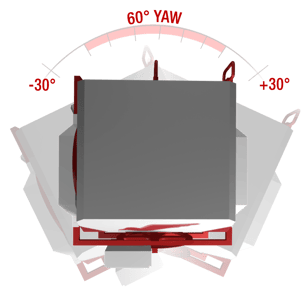
- Verify that the motion platform is powered on. If the red stop button on the push
button station is illuminated, the platform has power.
- Toggle the "motion platform" toggle-switch to ON when launching a flight through Navigator. The toggle-switch should change to ON/Green when properly selected.


Power-down sequence
- End the flight if one is currently running.

- Press the clear red button on the push-button station to turn off the motion platform.
 The backlight inside the red button should extinguish, indicating the motion system is off.
 - Power down the motion platform by turning off the power strip.*
*Note: Do not power off the power strip if the simulator's computer is still running. Turning off the computer by removing power suddenly can cause significant issues if things get corrupted.
Troubleshooting
When initializing the motion platform, you may occasionally encounter the following
issues:
- Motion platform will not power up
- Motion platform will not perform initial calibration
- Motion platform will not return to center
- Red light on PB station doesn't illuminate
- Red light on PB Station turns on when pressed, then turns off immediately
- Yellow light not blinking after releasing the green button
- Yellow light blinking after releasing the green button
Motion platform will not power up, doesn't calibrate, or won't return to center
- Make sure the motion control box is plugged into the surge protector.
- Make sure the surge protector is turned on.
- Make sure the simulator is centered (especially the yaw axis).
- Make sure the emergency stop (located inside the cockpit) is released/disengaged.
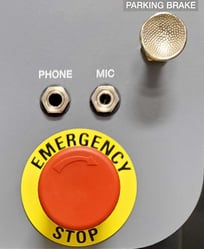
Note: Rotate the emergency stop button clockwise to disengage. - Make sure the pathway sensors are properly lined up with the reflectors and that there aren't any objects interrupting the beam.
Red light on PB station doesn't illuminate

- Make sure the push-button station cable is plugged into the motion control box.
- If the red light does not start blinking during initial calibration, then the light bulb is burned out and needs to be replaced. Contact Redbird Support and they can provide a price or part number for the light bulb.
Red light on PB station turns on when pressed, then turns off immediately
- Make sure the emergency stop button inside the cockpit is not engaged.
Note: Rotate the emergency stop button clockwise to disengage. - Make sure the emergency stop cable is plugged into the motion control box.
- If you continue to experience the red light shutting off, contact Redbird Support for further troubleshooting.
Yellow light not blinking after releasing the green button
- Make sure the simulator is centered (yaw axis especially). If it is not centered, turn off the motion platform, then manually move it to center and try again.
- On the motion control box, check the fault light.
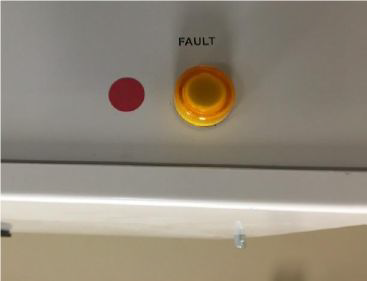
Count how many times the fault light flashes and then reference the table below.
This table is for Model 2 (white) motion control boxes.
Fault Light Flashes Fault Description 0 No Fault 1 Computer Problem
If power cycle does not clear, PLC or program must be replaced2 Yaw Axis Sensor
Encoder has failed, is not turning, or is not wired3 Pitch Axis Sensor
Pitch potentiometer failed or not wired4 Roll Axis Sensor
Roll potentiometer failed or not wired5 Yaw Axis Control
Yaw axis will not stop or is moving the wrong way6 Yaw Drive
Drive failed to run, indicating fault or lost power7 Pitch Drive
Drive failed to run, indicating fault or lost power8 Roll Drive
Drive failed to run, indicating fault or lost power9 Yaw Travel Limits
Limit sensors on at the wrong time, or both are on10 Pitch Travel Limits
Limit sensors on at the wrong time, or both are on11 Roll Travel Limits
Limit sensors on at the wrong time, or both are on12 Not Used
The above table is for the Model 2 (white) motion control boxes. For the Model 1 (grey) control boxes, reference the legacy document here: Grey Box Fault List
If unable to resolve the issue using the table above, contact Redbird Support for troubleshooting assistance, and reference the fault code you're getting.
Yellow light is blinking after releasing the green button
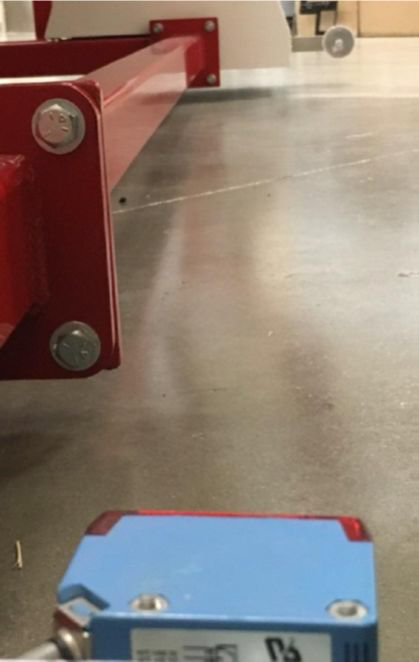
- Make sure there aren’t any obstructions on either side of the simulator. If there is an obstruction, remove it and restart the motion.
- Make sure both pathway sensors are aligned with the reflectors on the rear wheel covers.
- If one pathway sensor is not illuminated, re-align the sensor or reflector and attempt to restart.
- If the simulator does not move after checking the previous steps, contact Redbird Support for further diagnosis.
Pathway Sensor Models:
Contact Redbird Support with any questions or for troubleshooting assistance.