Purpose: This document provides step-by-step instructions for using Redbird Navigator.
Before you begin: Navigator is the operating system for Redbird simulators. It enables control of the simulator in a variety of ways and sharing information through cloud-based software. It can be used with a variety of portable devices.
Navigator comes with four core applications: 1) Dispatch; 2) Scenario Store; 3) Sim Management; and 4) Instructor Station. The details of the first three are covered in this User Guide. The details of how to use Instructor Station can be found in the Instructor Station User Guide.
If you have a Redbird product that requires a Pilot Key or a Redbird Account with a license associated with it, be sure to have either your key or your login information handy. If you plan to login to your Redbird account, your simulator must be connected to the Internet.
Instructions:
Find Your Flight
On a wireless device such as a tablet computer (recommended), smartphone, laptop computer, or by using the simulator itself, launch Navigator.
|
NOTE: If you use a device other than the simulator to access Navigator, be sure your device is connected to the simulator’s wireless Navigator network. NOTE: If you are using a Redbird Jay or Redbird TD/TD2 simulator, you will use Navigator on the simulator itself. |
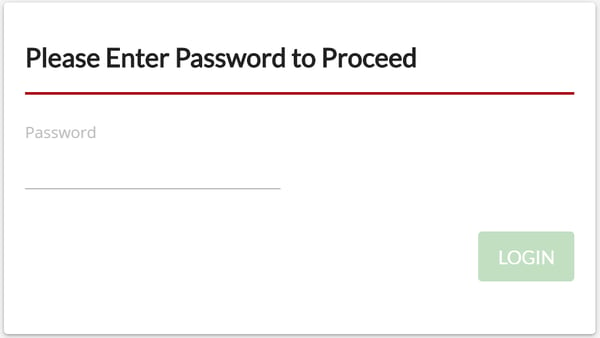
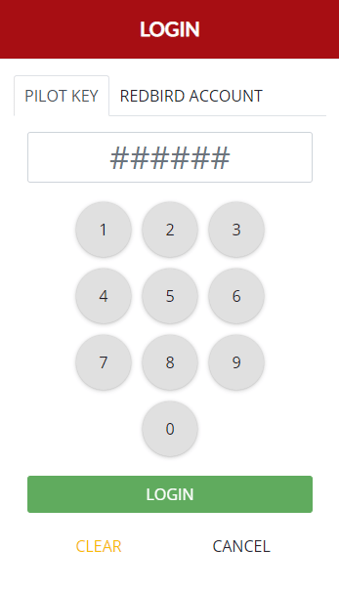
Insert your Pilot Key into the Pilot Key port on the switch panel of the simulator. The login screen appears.

Enter your login credentials (PIN) and click Login.
Alternatively, you can login to your Redbird account provided that your simulator is connected to the Internet by using the Redbird Account tab at the top of the login window.
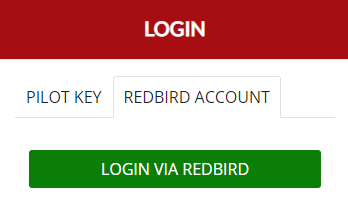
Click the Login Via Redbird button.
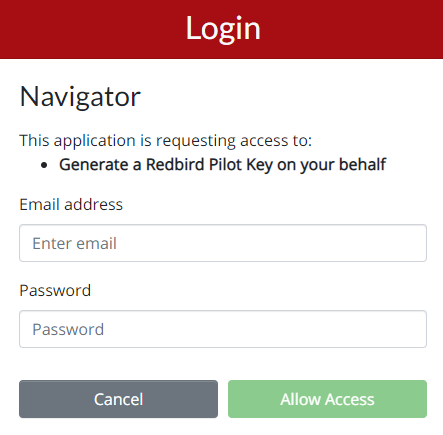
Provide your login credentials then click Allow Access.
You will now see the Redbird Navigator Main Menu.
%20(13).png?width=647&name=localhost_(iPad)%20(13).png)
|
NOTE: In addition to the four core applications, there may be other optional applications displayed on the Navigator Main Menu. |
No matter where you are in Navigator, you can return to the Navigator Main Menu anytime by clicking the home icon in the upper left corner.

If you want to logout of Navigator, click the person icon in the upper right corner and click Logout.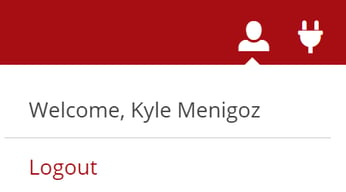
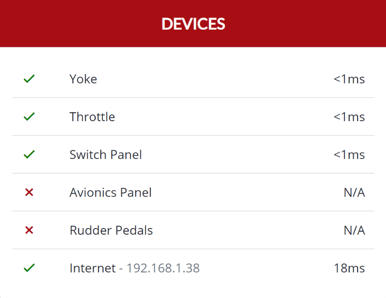
If you want to view the devices connected to the system, such as flight controls or the network, click on the plug icon in the upper right corner.
To turn the simulator off or restart the simulator, click the power button icon in the upper right corner.

The list of devices appears.
|
NOTE: Devices with green status means the devices is connected. Yellow status means the device is not connected. You will not be able to start a flight unless all devices are have a green checkmark on the left side. - The IP address of the simulator is displayed next to "Internet." |
If there is a software update or flight update available, a bell with an exclamation point will appear in the upper right corner.
Using the Sim Management Application
To launch the Sim Management application, from the Navigator Main Menu, click the Sim Management icon.
Overview tab
The Sim Management page appears with the Overview tab selected.
%20(3)-1.png?width=688&name=localhost_(iPad)%20(3)-1.png)
Scroll down to see the rest of the menu.
%20(4)-1.png?width=688&name=localhost_(iPad)%20(4)-1.png)
|
NOTE: The menu view above represents that of a tablet (such as an iPad) when it is rotated horizontally. The tab menu will be along the bottom of the screen when the table is rotated vertically. |
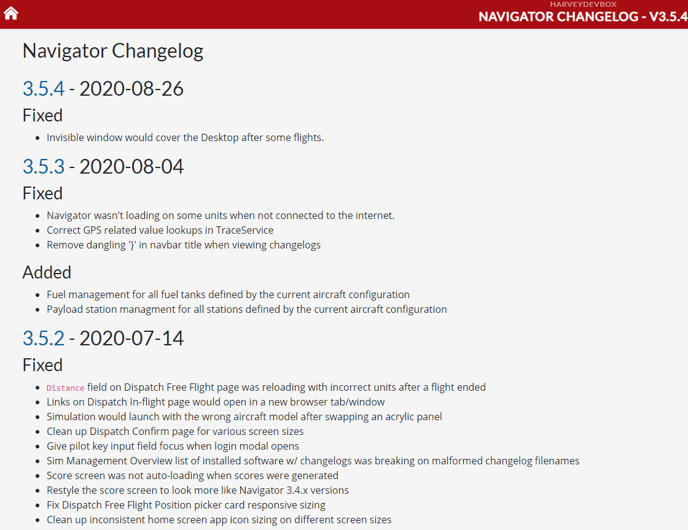
Click on the version number of any of the software items to view a change log history that includes all bug fixes and feature additions to date. For example, this is the change log for Navigator version 3.5.4:
Updates tab
To update the software or download updated flight scenarios, click Updates on the left side menu. The Updates login screen appears.
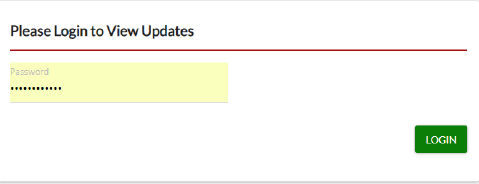
Enter the Simulator default admin password "Redbird12345" and click the Login button.
|
NOTE: You can reset the default admin password from the Settings tab. |
If there are updates available, click the Update All button. The installation progress bar will appear.
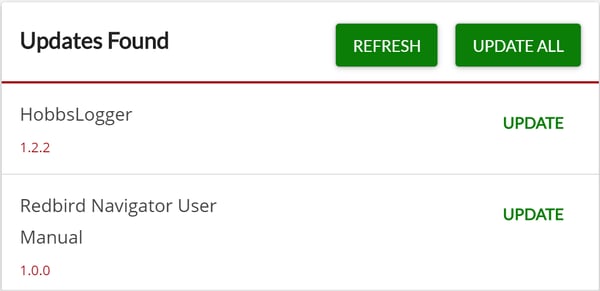
If there are no updates found, click the Refresh button to see if there are any recent updates.
Settings tab
To view an/or modify the simulator settings, click Settings on the left side menu. The login Settings screen appears.
Enter your admin password. Once you do, the Login button will activate. Click the Login button.
The settings tab appears.
%20(5).png?width=600&name=localhost_(iPad)%20(5).png)
To turn off a setting that is currently on, click the word ON. To turn on a setting that is currently off, click the word OFF. Use the following table for guidance.
|
Setting |
When On |
|
Sidekick Uploads Enabled |
With a pilot key plugged in, all data from any flight you fly are automatically updated to the Redbird Cloud |
|
Anonymous Mode Enabled |
Can fly without a pilot key plugged in |
|
Free Flight Enabled |
Can create Free flights in Dispatch application |
|
Scenario Store Enabled |
Can download scenarios from the Scenario Store application |
|
Find My Sim Enabled |
Your sim appears on the Find My Sim map available at redbirdflight.com. |
|
Require Password… |
Password required to restart and shutdown the simulator |
|
Using Non-Redbird Rudder Pedals |
Enables your Redbird simulator to allow the use of non-Redbird rudder pedals |
|
Use Metric Units |
Data displayed on navigator screen are in metric units |
|
Auto Apply Critical Updates |
Critical updates are installed without having to go through the update procedure |
To set the name of the simulator, enter a descriptive name into the Name textbox in the Sim Customization Settings area. For example, “Steve’s Flight School FMX.”
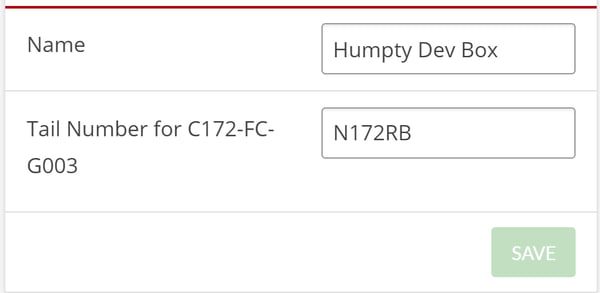
To set the tail number of the acrylic panel that's currently plugged in, enter the tail number into the Tail Number textbox.
Once you enter the changes, the Save button will activate. Click the Save button.
|
NOTE: Sim Admin Settings are intended for the person responsible for management or support of the simulator. Regular users do not need access to these settings. |
To change the Sim Admin password, click Change Password at the bottom of the Sim Admin Settings area.

Enter the new password twice and click Save.
Support tab
To contact support, on the left side menu click Support.
The Support tab appears.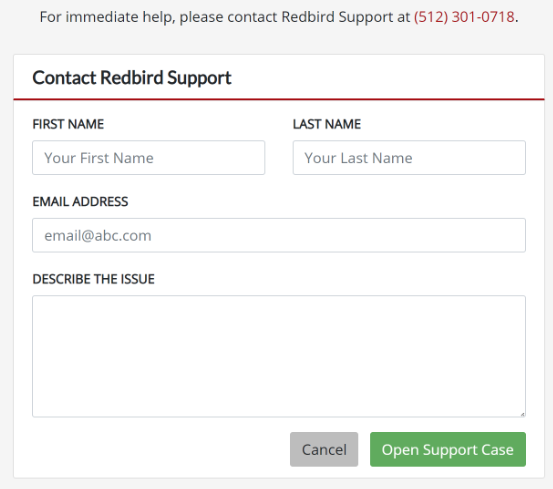
Enter your first name, last name, email address and a description of the issue in the appropriate text fields.
Click the Open Support Case button. A copy of the support request email is sent to you, Redbird Support, and the Sim Administrator.
|
NOTE: During Redbird business hours, typical customer support response time is under one hour. Otherwise, it’s the following business day. |
Using the Scenario Store Application
To launch the Scenario Store application, go to the Navigator Main Menu and click the Scenario Store icon.
The Scenario Store page appears.
%20(6).png?width=600&name=localhost_(iPad)%20(6).png)
|
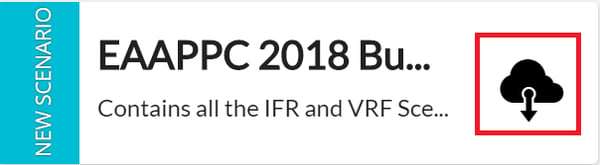
NOTE: Scenarios are bundles of flights. They are how GIFT and other Redbird packaged flight scenarios are distributed. You may download GIFT bundles, but will need a GIFT license to activate and fly GIFT bundles. |
To download a scenario from the Scenario Store, click the black cloud icon next to the title.
|
NOTE: If a scenario does not have a black cloud icon and instead has a red trash can, it means you've already downloaded that scenario. |
To delete a scenario from the Scenario Store you've already downloaded, click the red trash can icon to the right of the title.
Using the Dispatch Application
|
NOTE: Dispatch is where you go to see all of your flights. These include flights you've downloaded from the Scenario Store. |
To launch the Dispatch application, from the Navigator Main Menu, click the Dispatch icon.
The Dispatch page appears with the All tab selected.
All tab%20(7).png?width=600&name=navigator.redbirdflight.com___(iPad)%20(7).png)
You may search for flight scenarios, or sort them, using the Filters & Sorting functions at the top of the screen.
%20(15)-1.png?width=688&name=localhost_(iPad)%20(15)-1.png)
|
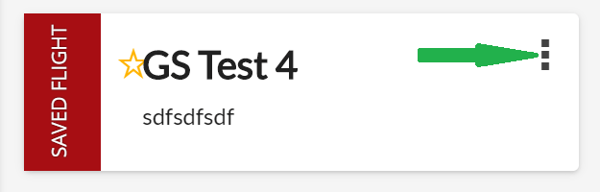
NOTE: Flight color code: Red: saved flight (i.e., stored on local machine, usually a flight saved by a user)Blue: downloaded from the Scenario Store Green: GIFT flight |
To edit the title, description, and tags of a saved flight, click on the menu icon (green arrow) for that flight.
The Editing Scenario screen appears.
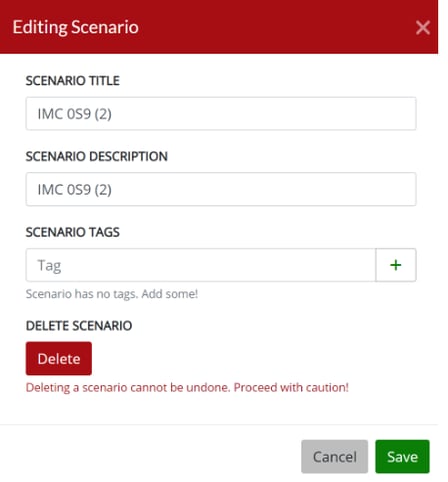
To change the title of the scenario, enter a new title in the Scenario Title textbox.
To change the description of the scenario, enter a new description in the Scenario Description textbox.
|
NOTE: One thing you can do to make flights easier to find in the future is to add descriptive tags to the flight. Tags are short, typically one or two words. You can add as many tags as you'd like. |
To add a searchable tag to a flight, enter the tag in the Add New Tag field and click the "+" to the right. Repeat the process for any additional tags.
After you've made all your edits, click the green Save Scenario button.
|
NOTE: The list of scenarios in Dispatch can get long. If there are some scenarios you're sure you won't use again, you may want to delete them. |
To delete the scenario from Dispatch, click the red Delete Scenario button.
To locate a flight in Dispatch, you can scroll through the list or you can use the search box at the top.

To use the search box, enter the title of the flight or a tag and hit Enter. The flights with that search criteria will appear.
You can always sort the list of flights—before or after a search—by clicking the Sort A-Z button to the right of the search box.
To remove the search criteria, click the "X" on the right end of the search box.
|
NOTE: If there's a scenario you use frequently, you may want to favorite it to make it easier to find in the future. |
Favorites tab
To make a scenario a favorite, click the yellow star to the left of the scenario title. The yellow star fills in when it becomes a favorite and it is added to the Favorites tab.
To quickly locate your favorites, click the Favorites tab on the side menu.

To remove a flight from Favorites, click the filled-in yellow star. It becomes unfilled and no longer appears in the Favorites menu, though still appears in its original menu.
Folders Tab
Some scenarios are organized into folders, such as GIFT Private Pilot, or other products, including future Redbird products.
%20(14).png?width=688&name=localhost_(iPad)%20(14).png)
GIFT tab
Instead of using folders or filtering, you may also view your GIFT flights by selecting the GIFT tab on the left side menu. The GIFT tab appears.
%20(16).png?width=600&name=localhost_(iPad)%20(16).png)
|
NOTE: Greyed-out GIFT scenarios are locked. You will need a PIN code to unlock them, or to login to your GIFT-licensed Redbird account through Navigator - Your simulator must be connected to the Internet to login to your Redbird account. |
To unlock GIFT flights, either login to your Redbird account through Navigator, or plug a pilot key with an activated GIFT license on it into the USB port on the front simulator panel (Pilot Key USB slot) and a PIN keypad will appear.
|
NOTE: If using a Jay or TD/TD2, use any available USB port on the simulator computer. |
Enter your PIN code and click the green Submit Code button at the bottom, or login to your Redbird account using the Redbird account login tab. If you have a GIFT license, the GIFT flights will be unlocked.
%20(7).png?width=600&name=localhost_(iPad)%20(7).png)
|
NOTE: Plugging in a pilot key logs you into the Navigator system. To logout, click the person icon in the upper right corner of the page and then click Logout. |
To start a GIFT flight, click the flight title in the list. The Confirm Flight Start Dialog appears.
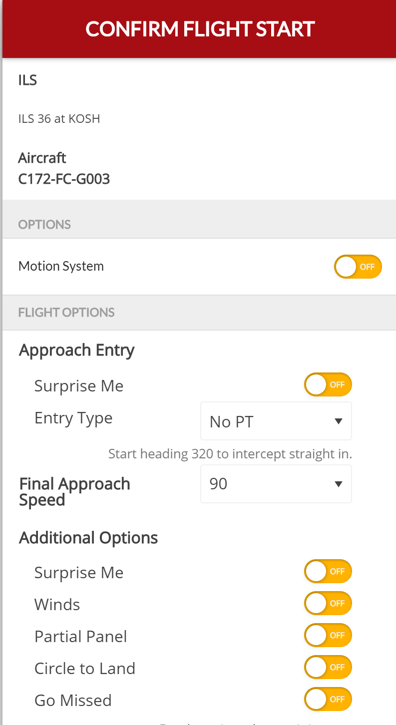
|
NOTE: For GIFT flights, the Confirm Flight Start dialog provides options you can select before you start your flight. The image above is specific to an ILS flight. Different flight types will have slightly different options to choose from. All flights have the option to turn on the motion system. |
To turn on the motion system, click the word OFF to the right of Motion System in the Options section of the dialog.
|
NOTE: All GIFT flights have Surprise Me option in the Additional Options section. The Surprise Me option chooses a random combination of all the options below it, including not choosing any at all. |
To turn on Surprise Me, click the word OFF to the right of Surprise Me in the Additional Options section.
To fly the GIFT flight with in-flight coaching, click the word OFF to the right of With Coaching.
When you’re ready to start the GIFT flight, click the Start Flight button at the bottom of the Confirm Flight Start dialog.
Saved tab
To see your saved flights, click on the Saved tab on the side menu.
%20(8).png?width=600&name=localhost_(iPad)%20(8).png)
|
NOTE: The Saved flight list is equivalent to the All list minus the GIFT flights. |
Free Flight tab
To create a Free flight, click the Free Flight tab on the left side menu. The Free Flight menu appears.
%20(9).png?width=600&name=localhost_(iPad)%20(9).png)
|
NOTE: When using the Redbird Jay or Jay Velocity the column visible on the left will allow you to select your aircraft. In the Redbird TD and TD2, you may choose if your Cessna has a high performance engine, retractable gears, and/or constant speed prop. Selecting high performance engine and constant speed prop essentially turns your airplane into a Cessna 182. |
|
NOTE: Free flights allow you to create your own custom flight and start from anywhere on the ground or in the air. |
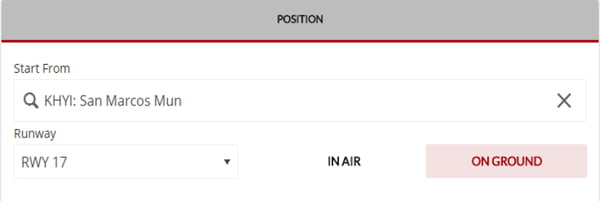
To start a flight on a runway, input a valid ICAO identifier for the airport you want to take off from the Start From textbox located in the Position column. The airport appears in the Airports list.
%20(10).png?width=652&name=localhost_(iPad)%20(10).png)
Click on the airport and then select a runway to take off from. Upon starting the flight, you will be lined up for takeoff on the selected runway.
To start a flight in the air, click the In Air button.
|
NOTE: By default, the In Air option puts your aircraft roughly at pattern altitude 5nm from the runway you've selected, on runway heading. Adjust these values any way you wish |
%20(11).png?width=631&name=localhost_(iPad)%20(11).png)
Change any of the following In Air fields as desired:
Heading: in degrees
Radial: in degrees FROM airport
Distance: in nautical miles
AGL/MSL: select one
Altitude: in AGL or MSL
Airspeed: in knots
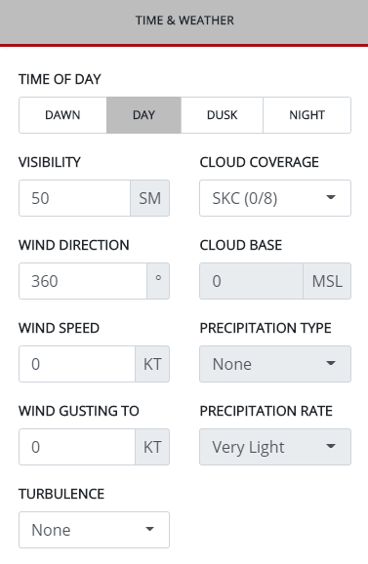
From the Time & Weather column, make the following selections:
Time of Day:Dawn, Day, Dusk, or Night
Visibility: in statute miles
Wind Direction: in degrees
Wind Speed: in knots
Gusting To: in knots
Turbulence: choices are None; Light; Moderate; Heavy; Severe
Cloud Coverage: choices are SKC; FEW; SCT; BKN; OVC
Cloud Base: feet MSL
Precipitation Type: choices are None; Rain; Snow
Precipitation Rate: choices are Very Light; Light; Moderate; Heavy: Very Heavy
In the Options column, to turn motion on, click the motion system switch so that it is green and says On. To turn motion Off, click the switch again.

|
NOTE: In the Redbird Jay model simulator you will also be able to choose the aircraft type. In the Redbird TD and TD2, you may choose if your Cessna has a high performance engine, retractable gears, and/or constant speed prop. Selecting high performance engine and constant speed prop essentially turns your airplane into a Cessna 182. |
When you have the Free flight parameters set as desired, click the Start Flight button at the bottom right of the Dispatch tab.

|
NOTE: Navigator will not let you start a second flight when one is already in progress. |
The Your Flight is Loading dialog appears.

After the flight loads, the Flight in Progress dialog appears.
%20(12).png?width=443&name=localhost_(iPad)%20(12).png)
|
NOTE: If you have simulator add-ons such as Corvus, buttons to use them will appear here. |
|
NOTE: The image above is indicative of a Free flight. If it was an ILS flight it would include a link to the approach plate and show a checklist. |
To pause the flight, click the Pause Flight button.
To unpause the flight, click the Unpause Flight button.
To end the flight, click the End Flight button.
To launch Instructor Station, click Instructor Station.
|
NOTE: For technical support, contact the Redbird Technical Support Team using the Navigator support menu explained earlier in this document, or via email at support@redbirdflight.com, or by calling +1 512-301-0718 between the hours of 7am-6pm U.S. Central Time (-5/-6 UTC) Monday - Friday, excluding normal U.S. holidays. |