
Opening the 'Windows Game Controllers’ window
Plug a standard windows keyboard into your simulator.
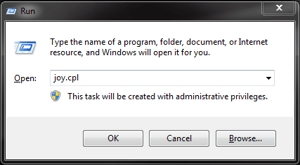
Hold the Windows key and tap the R key to open the Windows Run Command.
Type joy.cpl into the window.
Click OK and the Game Controllers window should open.
Calibrating the Throttle
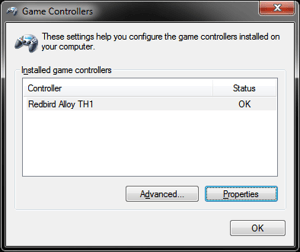
Select the Redbird Alloy TH3 from the list of available game controllers.
Click the Properties button.
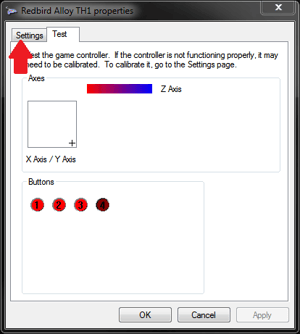 Navigate to the Settings tab up in the top left corner of the Alloy TH1 Properties window that pops up.
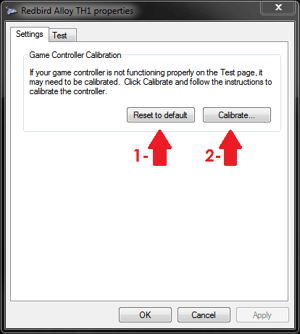 First click the Reset to default button, and then click the Calibrate button.
Follow the instructions in the Game Device Calibration Wizard that pops up.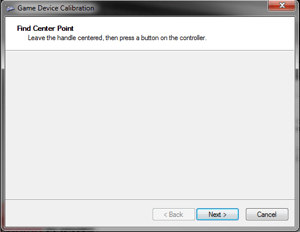 At the Find Center Point screen, adjust the throttle/prop/mixture verniers to (approximately) the center of their range of motion, and when all verniers are centered click Next.
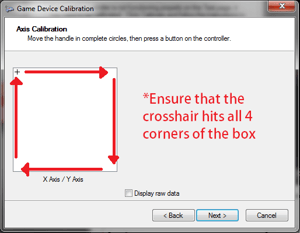
At the X/Y Axis Calibration page, move the Throttle and Prop verniers all the way open, and then all the way closed (repeat 2x), then center both the Throttle and Prop verniers (put the crosshair in the center of the white box); click Next when finished.

The next screen is a Verify Center Point screen leave all three verniers centered, and click next.
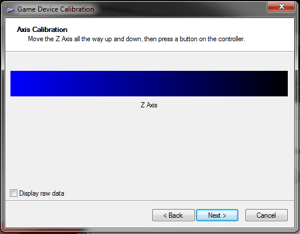
At the Z Axis Calibration page, move the Mixture vernier all the way open, and then all the way closed (repeat 2x), then center the Mixture vernier (put the crosshair approximately in the center of the Z-Axis bar); click Next when finished.
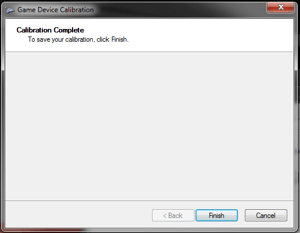
Click Finish on the final page of the Game Device Calibration Wizard to close the wizard.
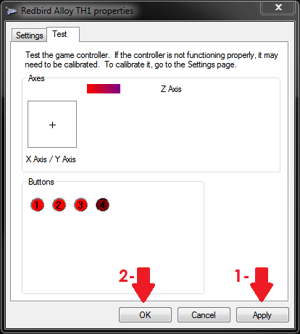
Back at the Redbird Alloy TH1 Properties Window:
- First click Apply,
- Then click OK.
*If Apply is not clicked first, Windows may not apply your calibration settings properly.
Test your TH1 Throttle functions after calibration to ensure that they are properly calibrated:
- Throttle vernier should move the X Axis (left and right) and hit each side of the box.
- Prop vernier should move the Y Axis (up and down) and hit the top and bottom of the box.
- Mixture vernier should move the Z Axis slider, and hit each end of the bar.
- Landing gear up should light up Button #1.
- Landing gear down should light up Button #2.
- Flaps up should light up Button #3.
- Flaps down should light up Button #4.
Contact Redbird Support if you require assistance or run into any issues with this calibration process on your Redbird Alloy TH1 Throttle.