Purpose: This document provides step-by-step instructions for using the Redbird Instructor Station.
Audience: Instructors using Redbird Instructor Station with their students.
Before you begin: Navigator is the operating system for Redbird simulators. This document details Instructor Station. The details for Navigator features and applications can be found in the Navigator User Guide.
Instructor Station works best from a separate device connected through a network; see Connecting to your Redbird from a wireless device for instructions on how to connect another device to your simulator.
Assumptions: Instructor Station only works if a flight is running, so start a simulation before you start Instructor Station.
Jump To:
Map | Basic Weather | Advanced Weather | Position | Failures | Fuel, W&B | Time | Reality
Launch Instructor Station
1. From the Flight in Progress dialog, click Launch Instructor Station at the bottom (blue arrow).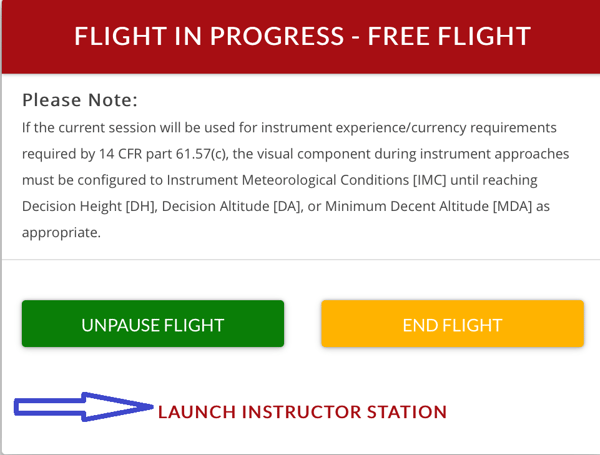
|
NOTE: You can also launch Instructor Station from Navigator Springboard by clicking the Instructor Station icon. |
2. The Instructor Station home page appears with the Map tab selected.
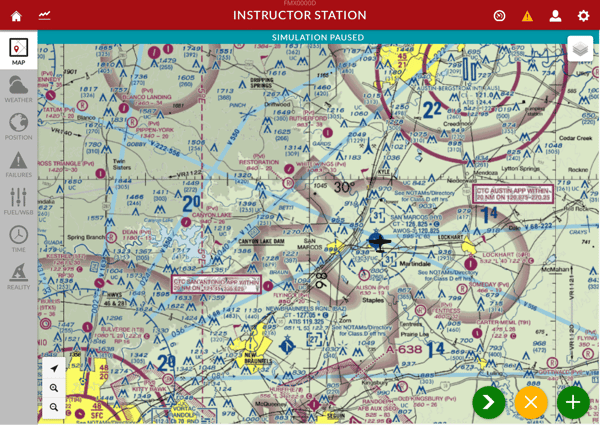
Map Tab
3. To view the Vertical Track and Glidepath charts, click the chart icon in the upper left corner of the page.
4. The charts appears at the bottom of the map. Click Vertical Track or Glidepath buttons to view each graph.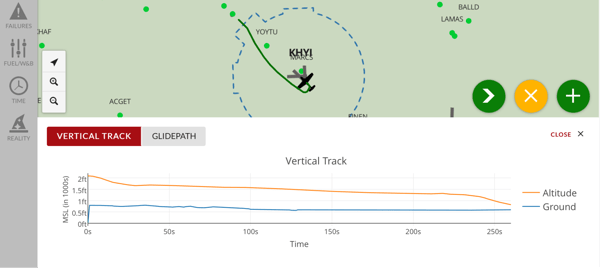
5. To view detailed flight information on the data bar, click the dial icon in the upper right corner of the page.
6. The data bar appears across the top of the map.

7. To view different layers on the map, click the layers icon in the upper right corner of the map.
8. The layers menu appears.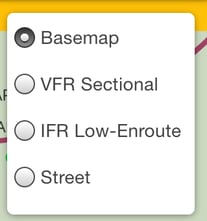
9. Choose one of the following from the layers menu:
Basemap
VFR Sectional
IFR Low-Enroute
Street
10. To view the map pop up menu, click the "+" in the lower right corner of the map.
11. The map pop up menu appears.
12. To save the current flight, click the Save Flight icon.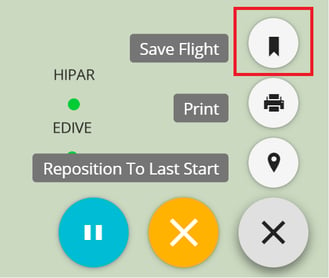
13. The Save Flight dialog appears.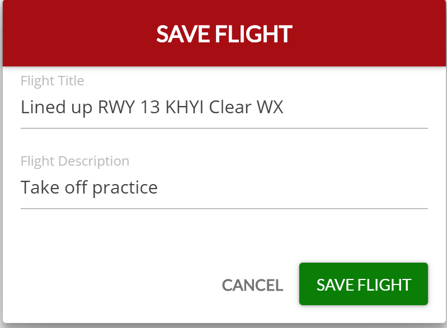
14. Enter the flight title in the Flight Title textbox and the flight description in the Flight Description text box.
15. Click the Save Flight button. The saved flight can be found in Dispatch (see Navigator User Guide).
16. To print the screen, including the charts at the bottom, click the Print icon.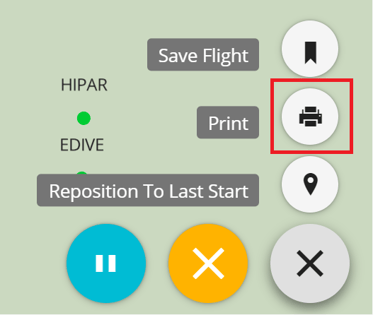
17. To reposition the flight to the point where the flight last started, click the Reposition To Last Start icon.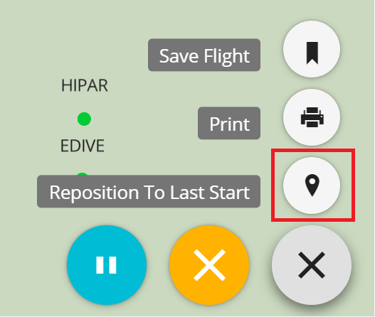
18. To close the map pop up menu, click the grey "X" in the lower right corner.
19. To pause the flight, click the blue "||" in the lower right corner.
20. To end the flight, click the orange "X" in the lower right corner.
21. To reposition the flight on the map, click the map in the general area that you want to place the flight. The Reposition dialog appears.
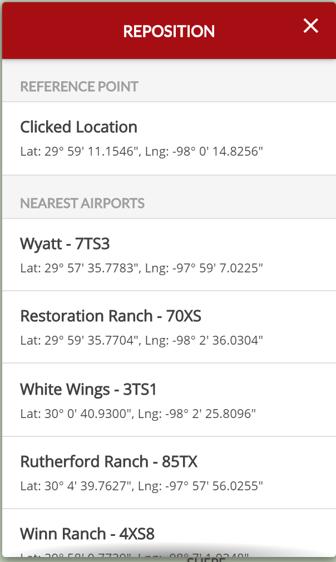
|
NOTE: The Reference Point displays the clicked location. |
22. To reposition the aircraft at one of the nearby airports, scroll down the list and click the airport of choice.
23. If you don't want to reposition at an airport, continue to scroll down the list and you will see the nearest navaids and waypoints. Click one of those to reposition the aircraft there.
Weather Tab
24. To control the flight's weather conditions, click Weather on the left side menu. The Weather tab appears.
|
NOTE: To control a flight's weather conditions, you can exercise basic weather control or advanced weather control. |
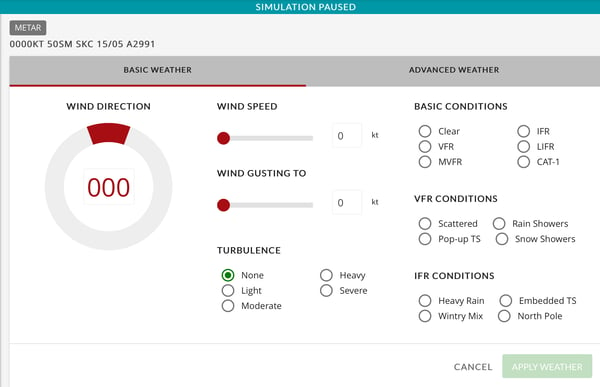
25. To control the basic weather settings, make sure Basic Weather tab is selected at the top of the Weather screen.
26. To control the wind direction, place your cursor over the red portion of the Wind Direction compass and drag it to the desired direction.
27. To set the wind speed, drag the Wind Speed slider to the desired setting (in knots).
28. To set the wind gust speed, drag the Wind Gusting To slider to the desired setting (in knots).
29. To set the turbulence level, select one of the following choices in the Turbulence section:
None
Light
Moderate
Heavy
Severe
30. To set the basic weather conditions, select one of the following choices in the Basic Conditions section:
Clear
VFR
MVFR
IFR
LIFR
CAT-1
31. To specify VFR conditions, select one of the following choices in the VFR Conditions section:
Scattered
Pop-up TS
Rain Showers
Snow Showers
32. To specify IFR conditions, select one of the following choices in the IFR Conditions section:
Heavy Rain
Wintery Mix
Embedded TS
North Pole
|
NOTE: After you make at least one change in the Basic Weather dialog, the Apply Weather button will activate. |
.
33. To save your changes click the Apply Weather button.
34. To control the advanced weather settings, click Advanced Weather tab at the top of the Weather screen. The Advanced Weather dialog appears.
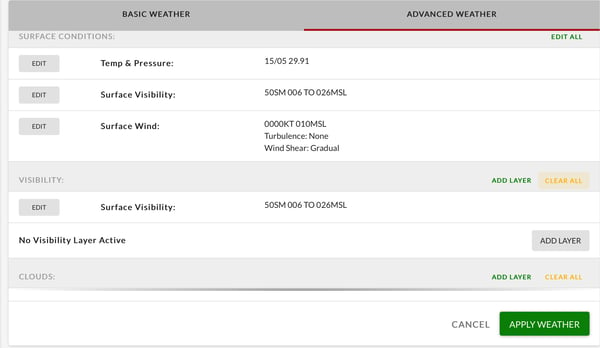
35. To edit the surface conditions, click the Edit All button at the upper right of the Surface Conditions section.

36. The Surface Conditions dialog appears.
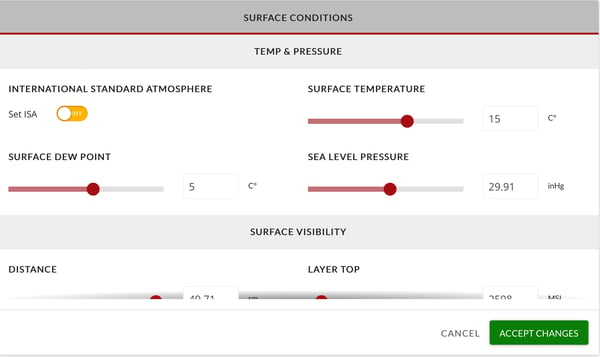
Temp & Pressure
37. To set the temperature and pressure to International Standard Atmosphere (ISA), click the Set ISA switch to the On position.
38. To set the surface dew point, drag the Surface Dew Point slider to the desired setting (in degrees Celsius).
39. To set the surface temperature, drag the Surface Temperature slider to the desired setting (in degrees Celsius).
40. To set the sea level pressure, drag the Sea Level Pressure slider to the desired setting (in in.Hg).
Surface Visibility
41. To set the surface visibility distance, drag the Distance slider to the desired setting (in statute miles).
42. To set the layer top of the visibility, drag the Layer Top slider to the desired setting (in feet above mean sea level).
Surface Wind
43. Scroll down to see the Surface Wind section of the Surface Conditions dialog.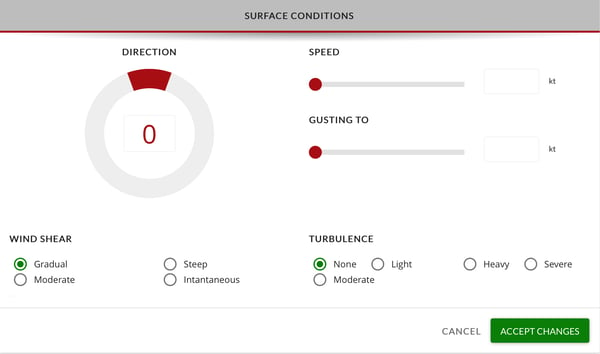
44. To control the wind direction of the surface wind, place your cursor over the red portion of the Direction compass and drag it to the desired direction.
45. To set the wind speed, drag the Speed slider to the desired setting (in knots).
46. To set the wind gust speed, drag the Gusting To slider to the desired setting (in knots).
47. To specify wind shear, select one of the following choices in the Wind Shear section:
Gradual
Moderate
Steep
Instantaneous
48. To specify turbulence, select one of the following choices in the Turbulence section:
None
Light
Moderate
Heavy
Severe
|
NOTE: After you make at least one change in the Advanced Weather dialog, the Accept Changes button will activate. |
49. When you have the surface conditions the way you want, click the Accept Changes button in the lower right.
Visibility
|
NOTE: To produce haze, create a limited visibility layer with few or no clouds. |
|
NOTE: To add a visibility layer, you will have to click an Add Layer button twice. |
50. To add a visibility layer, click either of the Add Layer buttons on the right of the Visibility section.
51. The Visibility layer dialog appears.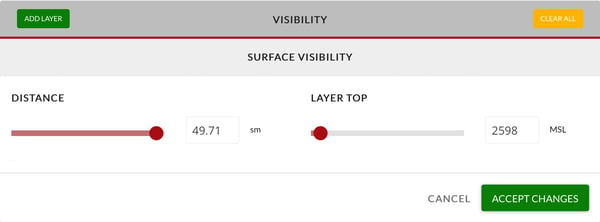
52. Click the Add Layer button in the upper left corner of the Visibility dialog. The edit Visibility Layer dialog appears.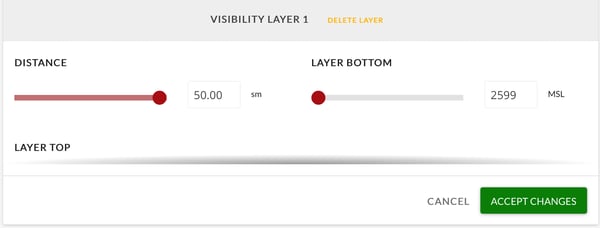
53. To set the visibility distance, drag the Distance slider to the desired setting (in statute miles.
54. To set the layer bottom of the visibility, drag the Layer Bottom slider to the desired setting (in feet above mean sea level).
55. To set the layer top of the visibility, drag the Layer Top slider to the desired setting (in feet above mean sea level).
56. To add another visibility layer, click the Add Layer button in the upper right corner.
57. To delete a visibility layer, click Delete Layer to the right of the visibility layer name.
58. To clear all the visibility layers, click the Clear All button to the far right of Visibility.
59. When you have the visibility conditions the way you want, click the Accept Changes button in the lower right.
Clouds
|
NOTE: If you want to produce instrument meteorological conditions (i.e., a layer where you are in the clouds and can't see the ground), it is recommended that you set a cloud layer and a visibility layer with low visibility settings at the same altitudes as the cloud layer. |
|
NOTE: To add a cloud layer, you will have to click Add Layer twice in two different locations. |
60. To add a cloud layer, click the Add Layer button on the right of the Clouds section.
61. The Cloud layer dialog appears.

62. Click either of the Add Layer buttons in the Cloud dialog. The edit Cloud Layer dialog appears.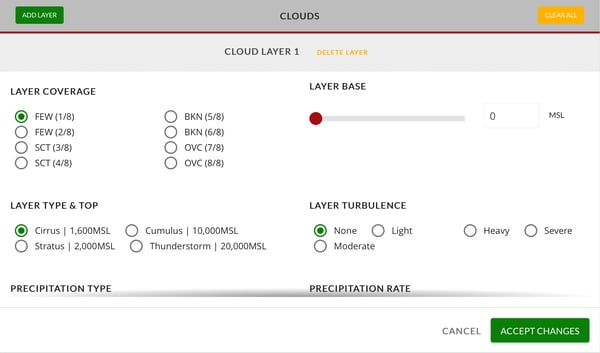
63. To specify the cloud layer coverage, select one of the following choices in the Layer Coverage section:
Few (1/8)
Few (2/8)
SCT (3/8)
SCT (4/8)
BKN (5/8)
BKN (6/8)
OVC (7/8)
OVC (8/8)
64. To specify the cloud layer type and top, select one of the following choices in the Layer Type & Top section:
Cirrus | 1,600MSL
Stratus | 2,000MSL
Cumulus | 10,000MSL
Thunderstorm | 20,000MSL
65. To set the layer base, drag the Layer Base slider to the desired setting (in feet above mean sea level.
66. To specify the cloud layer turbulence, select one of the following choices in the Layer Turbulence section:
None
Light
Moderate
Heavy
Severe
67. Scroll down to see the rest of the cloud controls.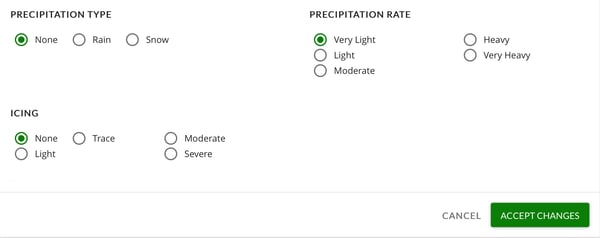
68. To specify the precipitation type, select one of the following choices in the Precipitation Type section:
None
Rain
Snow
69. To specify icing, select one of the following choices in the Icing section:
None
Trace
Light
Moderate
Severe
70. To specify the precipitation rate, select one of the following choices in the Precipitation Rate section:
Very Light
Light
Moderate
Heavy
Very Heavy
71. To add another cloud layer, click the Add Layer button in the upper right corner.
72. To delete a cloud layer, click Delete Layer to the right of the cloud layer name.
73. To clear all the cloud layers, click the Clear All button to the far right of Clouds.
74. When you have the clouds the way you want them, click the Accept Changes button in the lower right.
75. When you've made all the advanced weather changes you want to make, click the Apply Weather button in the lower right corner of the Advanced Weather dialog.
Position Tab
|
NOTE: The Position tab is used to reposition the aircraft on the ground and in the air. |
On the ground
76. When you click Position on the left side menu, the Position tab appears with On Ground selected.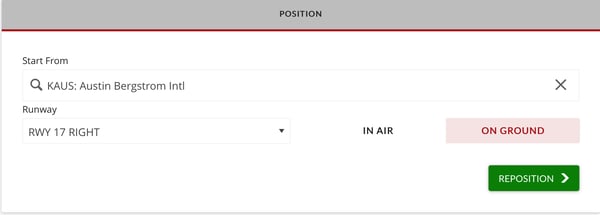
77. To change the takeoff airport, click the "X" to the far right of the Start From textbox to clear the field.
78. Enter the ICAO identifier of the new airport in the Start From text box.
79. From the Runway dropdown menu, choose the runway you want to take off from.
80. When you have everything the way you want on the ground, click the Reposition button in the lower right.
In the air
81. To change the aircraft's position so that it is in the air, click the In Air button on the Position tab.
82. The Position tab with In Air selected appears.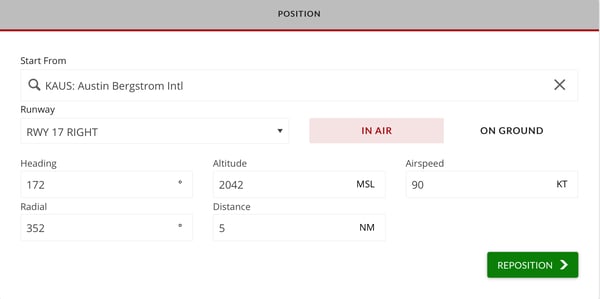
83. To change the heading of the aircraft, enter the heading in the Heading textbox in degrees.
84. To change the radial of the aircraft, enter the radial in the Radial textbox in degrees.
85. To change the altitude of the aircraft, enter the altitude in the Altitude textbox in feet above mean sea level.
86. To set the distance the aircraft is from its current position, enter the distance in the Distance textbox in nautical miles.
87. To change the airspeed of the aircraft, enter the airspeed in the Airspeed textbox in knots.
88. When you have everything the way you want it, click the Reposition button in the lower right.
Failures
89. To bring up the Failures control panel, click Failures on the left-side menu.
|
NOTE: The Failures control panel enables you to set on-the-ground or in-the-air failures for the current flight. Many failures come with the option to fail right away or after a configurable delay. |
90. The Failures control panel appears.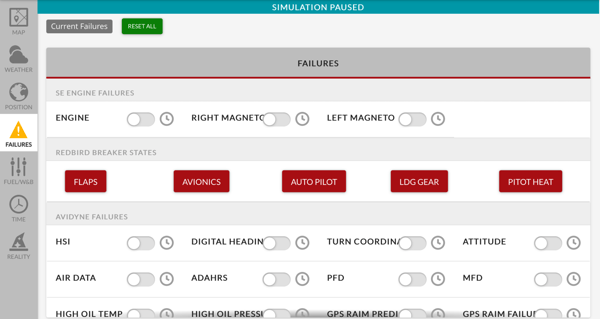
91. To set a failure to occur immediately, click the switch to the right of the failure type.
92. The failure occurs immediately.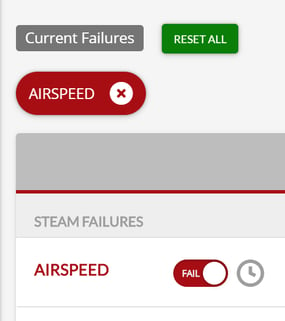
93. To remove the failure and return the system to normal operation, click the "X" to the right of the failure tag, or click the same fail switch you clicked to activate the failure.
94. To set a failure to occur after a specified delay, click the clock to the right of the failure type.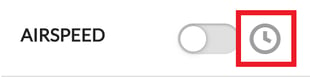
95. The Trigger after menu appears.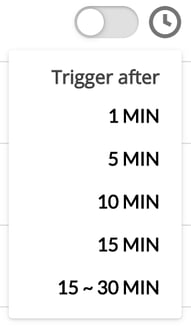
96. Select one of the following time delay options by clicking it:
1 minute
5 minutes
10 minutes
15 minutes
15 – 30 minutes
97. The delayed failure notification (i.e., yellow "X") appears.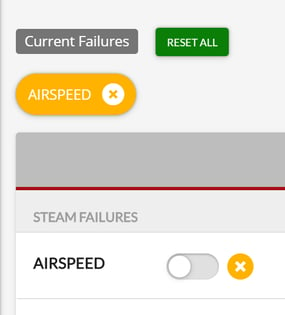
98. To delete it prior to failure, click the "X" to the right of the failure tag.
99. To trip the electrical circuit breaker for a system, click the appropriate button in the Redbird Breaker States section.
|
NOTE: In full-size Redbird simulators, a physical breaker button pops out on the instrument panel and can be pushed back in, just as in an actual aircraft. In Redbird Jay, TD, and TD2 simulators, the breaker is simulated on screen in the software. |
100. Push the breaker button in or click the breaker button again to re-establish the connection. The breaker will immediately pop-out again if the failure condition still exists.
Fuel / Weight & Balance
101. To set the fuel and/or weight of the aircraft, click Fuel/W&B on the left-side menu.
102. The Fuel/W&B tab appears.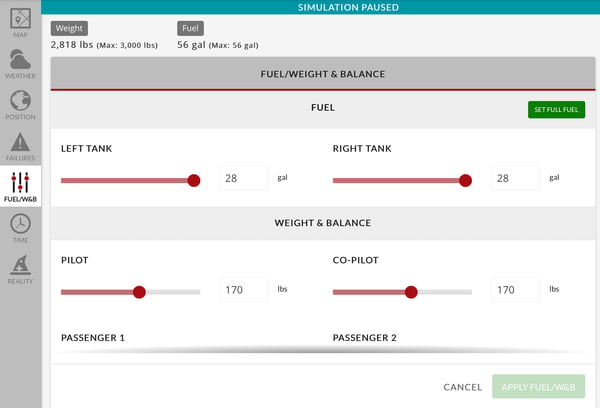
103. To set the fuel level in the left or right tank, drag the Left Tank or Right Tank sliders to the desired setting (in gallons).
104. To set the weight of the pilot or co-pilot, drag the Pilot or Co-Pilot slider to the desired setting (in pounds).
105. To set the weight of the passenger(s), drag the Passenger 1 or Passenger 2 slider to the desired setting (in pounds).
|
NOTE: When you make at least one change, the Apply Fuel/W&B button will activate. |
106. When you have the fuel and weight the way you want it, click the Apply Fuel/W&B button.
Time
107. To set the time of the flight, click Time on the left-side menu.
108. The Time tab appears.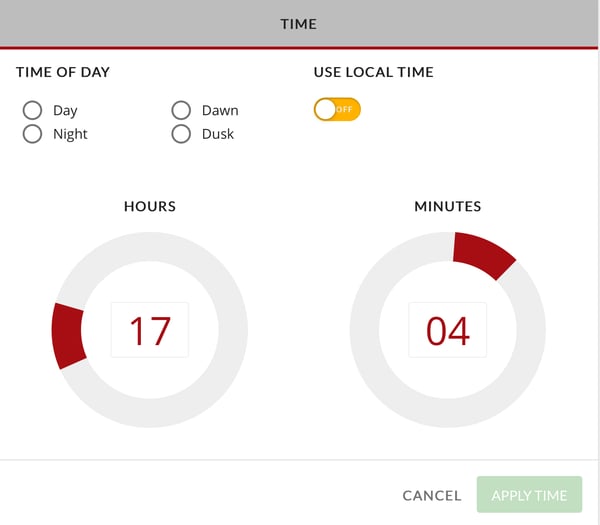
109. To specify the time of day, select one of the following choices in the Time of Day section:
Day
Night
Dawn
Dusk
110. By default, time is indicated in Zulu. To use local time instead, click the Use Local Time switch to the On position.
111. To set the hours and minutes manually, drag the red dials to the desired values.
|
NOTE: When you make at least one change, the Apply Time button will activate. |
112. When you have the time set the way you want it, click the Apply Time button.
Reality
113. To bring up the Reality control panel, click Reality on the left-side menu.
|
NOTE: The Reality control panel enables you to do two things. First, you can enter Orbit mode, which is a way to slew the aircraft inside the simulation without changing the configuration of the airplane or the flight conditions in general. Second, you can increase the simulation rate up to 128 times faster than real time. This enables you to speed up a portion of your flight, such as an uneventful portion of a cross country. |
114. The Reality control panel appears.

115. To enter Orbit mode, click the Enter Redbird Orbit button in the lower right corner of the Orbit mode section.
|
NOTE: The instructions for how to use Orbit mode are detailed in the Orbit Mode section of the Reality tab. Normal simulation speed is “1x.” |
116. To increase the speed of the simulation, click on the "+" in the lower right corner of the Simulation Rate section of the Reality tab.
117. To decrease the speed of the simulation, click on the “-”.
|
NOTE: For technical support, contact the Redbird Technical Support Team using the Navigator support menu on your Internet-connected simulator, or via email at support@redbirdflight.com, or by calling +1 512-301-0718 between the hours of 7am-6pm U.S. Central Time (-5/-6 UTC) Monday - Friday, excluding normal U.S. holidays. |